OK, let's decompile TH02's HUD code first, gain a solid understanding of how
increasing the score works, and then look at the item system of this game.
Should be no big deal, no surprises expected, let's go!
…Yeah, right, that's never how things end up in ReC98 land.
And so, we get the usual host of newly discovered
oddities in addition to the expected insights into the item mechanics. Let's
start with the latter:
Some regular stage enemies appear to randomly drop either or items. In reality, there is
very little randomness at play here: These items are picked from a
hardcoded, repeating ring of 10 items
(𝄆 𝄇), and the only source of
randomness is the initial position within this ring, which changes at
the beginning of every stage. ZUN further increased the illusion of
randomness by only dropping such a semi-random item for every
3rd defeated enemy that is coded to drop one, and also having
enemies that drop fixed, non-random items. I'd say it's a decent way of
ensuring both randomness and balance.
There's a 1/512 chance for such a semi-random
item drop to turn into a item instead –
which translates to 1/1536 enemies due to the
fixed drop rate.
Edit (2023-06-11): These are the only ways that items can randomly drop in this game. All other drops, including
any items, are scripted and deterministic.
After using a continue (both after a Game Over, or after manually
choosing to do so through the Pause menu for whatever reason), the
next
(Stage number + 1) semi-random item
drops are turned into items instead.
Items can contribute up to 25 points to the skill value and subsequent
rating (あなたの腕前) on the final verdict
screen. Doing well at item collection first increases a separate
collect_skill value:
Item
Collection condition
collect_skill change
below max power
+1
at or above max power
+2
value == 51,200
+8
value ≥20,000 and <51,200
+4
value ≥10,000 and <20,000
+2
value <10,000
+1
with 5 bombs in stock
+16
Note, again, the lack of anything involving
items. At the maximum of 5 lives, the item spawn function transforms
them into bomb items anyway. It is possible though to gain
the 5th life by reaching one of the extend scores while a
item is still on screen; in that case,
collecting the 1-up has no effect at all.
Every 32 collect_skill points will then raise the
item_skill by 1, whereas every 16 dropped items will lower
it by 1. Before launching into the ending sequence,
item_skill is clamped to the [0; 25] range and
added to the other skill-relevant metrics we're going to look at in
future pushes.
When losing a life, the game will drop a single
and 4 randomly picked or items in a random order
around Reimu's position. Contrary to an
unsourced Touhou Wiki edit from 2009, each of the 4 does have an
equal and independent chance of being either a
or item.
Finally, and perhaps most
interestingly, item values! These are
determined by the top Y coordinate of an item during the frame it is
collected on. The maximum value of 51,200 points applies to the top 48
pixels of the playfield, and drops off as soon as an item falls below
that line. For the rest of the playfield, point items then use a formula
of (28,000 - (top Y coordinate of item in
screen space × 70)):
Point items and their collection value in TH02. The numbers
correspond to items that are collected while their top Y coordinate
matches the line they are directly placed on. The upper
item in the image would therefore give
23,450 points if the player collected it at that specific
position.
Reimu collects any item whose 16×16 bounding box lies fully within
the red 48×40 hitbox. Note that
the box isn't cut off in this specific case: At Reimu's lowest
possible position on the playfield, the lowest 8 pixels of her
sprite are clipped, but the item hitbox still happens to end exactly
at the bottom of the playfield. Since an item's Y velocity
accelerates on every frame, it's entirely possible to collect a
point item at the lowest value of 2,240 points, on the exact frame
before it falls below the collection hitbox.
Onto score tracking then, which only took a single commit to raise another
big research question. It's widely known that TH02 grants extra lives upon
reaching a score of 1, 2, 3, 5, or 8 million points. But what hasn't been
documented is the fact that the game does not stop at the end of the
hardcoded extend score array. ZUN merely ends it with a sentinel value of
999,999,990 points, but if the score ever increased beyond this value, the
game will interpret adjacent memory as signed 32-bit score values and
continue giving out extra lives based on whatever thresholds it ends up
finding there. Since the following bytes happen to turn into a negative
number, the next extra life would be awarded right after gaining another 10
points at exactly 1,000,000,000 points, and the threshold after that would
be 11,114,905,600 points. Without an explicit counterstop, the number of
score-based extra lives is theoretically unlimited, and would even continue
after the signed 32-bit value overflowed into the negative range. Although
we certainly have bigger problems once scores ever reach that point…
That said, it seems impossible that any of this could ever happen
legitimately. The current high scores of 42,942,800 points on
Lunatic and 42,603,800 points on
Extra don't even reach 1/20 of ZUN's sentinel
value. Without either a graze or a bullet cancel system, the scoring
potential in this game is fairly limited, making it unlikely for high scores
to ever increase by that additional order of magnitude to end up anywhere
near the 1 billion mark.
But can we really be sure? Is this a landmine because it's impossible
to ever reach such high scores, or is it a quirk because these extends
could be observed under rare conditions, perhaps as the result of
other quirks? And if it's the latter, how many of these adjacent bytes do we
need to preserve in cleaned-up versions and ports? We'd pretty much need to
know the upper bound of high scores within the original stage and boss
scripts to tell. This value should be rather easy to calculate in a
game with such a simple scoring system, but doing that only makes sense
after we RE'd all scoring-related code and could efficiently run such
simulations. It's definitely something we'd need to look at before working
on this game's debloated version in the far future, which is
when the difference between quirks and landmines will become relevant.
Still, all that uncertainty just because ZUN didn't restrict a loop to the
size of the extend threshold array…
TH02 marks a pivotal point in how the PC-98 Touhou games handle the current
score. It's the last game to use a 32-bit variable before the later games
would regrettably start using arrays of binary-coded
decimals. More importantly though, TH02 is also the first game to
introduce the delayed score counting animation, where the displayed score
intentionally lags behind and gradually counts towards the real one over
multiple frames. This could be implemented in one of two ways:
Keep the displayed score as a separate variable inside the presentation
layer, and let it gradually count up to the real score value passed in from
the logic layer
Burden the game logic with this presentation detail, and split the score
into two variables: One for the displayed score, and another for the
delta between that score and the actual one. Newly gained points are
first added to the delta variable, and then gradually subtracted from there
and added to the real score before being displayed.
And by now, we can all tell which option ZUN picked for the rest of the
PC-98 games, even if you don't remember
📝 me mentioning this system last year.
📝 Once again, TH02 immortalized ZUN's initial
attempt at the concept, which lacks the abstraction boundaries you'd want
for managing this one piece of state across two variables, and messes up the
abstractions it does have. In addition to the regular score
transfer/render function, the codebase therefore has
a function that transfers the current delta to the score immediately,
but does not re-render the HUD, and
a function that adds the delta to the score and re-renders the HUD, but
does not reset the delta.
And – you guessed it – I wouldn't have mentioned any of this if it didn't
result in one bug and one quirk in TH02. The bug resulting from 1) is pretty
minor: The function is called when losing a life, and simply stops any
active score-counting animation at the value rendered on the frame where the
player got hit. This one is only a rendering issue – no points are lost, and
you just need to gain 10 more for the rendered value to jump back up to its
actual value. You'll probably never notice this one because you're likely
busy collecting the single spawned around Reimu
when losing a life, which always awards at least 10 points.
The quirk resulting from 2) is more intriguing though. Without a separate
reset of the score delta, the function effectively awards the current delta
value as a one-time point bonus, since the same delta will still be
regularly transferred to the score on further game frames.
This function is called at the start of every dialog sequence. However, TH02
stops running the regular game loop between the post-boss dialog and the
next stage where the delta is reset, so we can only observe this quirk for
the pre-boss sequences and the dialog before Mima's form change.
Unfortunately, it's not all too exploitable in either case: Each of the
pre-boss dialog sequences is preceded by an ungrazeable pellet pattern and
followed by multiple seconds of flying over an empty playfield with zero
scoring opportunities. By the time the sequence starts, the game will have
long transferred any big score delta from max-valued point items. It's
slightly better with Mima since you can at least shoot her and use a bomb to
keep the delta at a nonzero value, but without a health bar, there is little
indication of when the dialog starts, and it'd be long after Mima
gave out her last bonus items in any case.
But two of the bosses – that is, Rika, and the Five Magic Stones – are
scrolled onto the playfield as part of the stage script, and can also be hit
with player shots and bombs for a few seconds before their dialog starts.
While I'll only get to cover shot types and bomb damage within the next few
TH02 pushes, there is an obvious initial strategy for maximizing the effect
of this quirk: Spreading out the A-Type / Wide / High Mobility shot to land
as many hits as possible on all Five Magic Stones, while firing off a bomb.
Turns out that the infamous button-mashing mechanics of the
player shot are also more complicated than simply pressing and releasing the
Shot key at alternating frames. Even this result took way too many
takes.
Wow, a grand total of 1,750 extra points! Totally worth wasting a bomb for…
yeah, probably not. But at the very least, it's
something that a TAS score run would want to keep in mind. And all that just
because ZUN "forgot" a single score_delta = 0; assignment at
the end of one function…
And that brings TH02 over the 30% RE mark! Next up: 100% position
independence for TH04. If anyone wants to grab the
that have now been freed up in the cap: Any small Touhou-related task would
be perfect to round out that upcoming TH04 PI delivery.
Last blog post before the 100% completion of TH01! The final parts of
REIIDEN.EXE would feel rather out of place in a celebratory
blog post, after all. They provided quite a neat summary of the typical
technical details that are wrong with this game, and that I now get to
mention for one final time:
The Orb's animation cycle is maybe two frames shorter than it should
have been, showing its last sprite for just 1 frame rather than 3:
The text in the Pause and Continue menus is not quite correctly
centered.
The memory info screen hides quite a bit of information about the .PTN
buffers, and obscures even the info that it does show behind
misleading labels. The most vital information would have been that ZUN could
have easily saved 20% of the memory by using a structure without the
unneeded alpha plane… Oh, and the REWIRTE option
mapped to the ⬇️ down arrow key simply redraws the info screen. Might be
useful after a NODE CHEAK, which replaces the output
with its own, but stays within the same input loop.
But hey, there's an error message if you start REIIDEN.EXE
without a resident MDRV2 or a correctly prepared resident structure! And
even a good, user-friendly one, asking the user to launch the batch file
instead. For some reason, this convenience went out of fashion in the later
games.
The Game Over animation (how fitting) gives us TH01's final piece of weird
sprite blitting code, which seriously manages to include 2 bugs and 3 quirks
in under 50 lines of code. In test mode (game t or game
d), you can trigger this effect by pressing the ⬇️ down arrow key,
which certainly explains why I encountered seemingly random Game Over events
during all the tests I did with this game…
The animation appears to have changed quite a bit during development, to the
point that probably even ZUN himself didn't know what he wanted it to look
like in the end:
The original version unblits a 32×32 rectangle around Reimu that only
grows on the X axis… for the first 5 frames. The unblitting call is
only run if the corresponding sprite wasn't clipped at the edges of the
playfield in the frame before, and ZUN uses the animation's frame
number rather than the sprite loop variable to index the per-sprite
clip flag array. The resulting out-of-bounds access then reads the
sprite coordinates instead, which are never 0, thus interpreting
all 5 sprites as clipped.
This variant would interpret the declared 5 effect coordinates as
distinct sprites and unblit them correctly every frame. The end result
is rather wimpy though… hardly appropriate for a Game Over, especially
with the original animation in mind.
This variant would not unblit anything, and is probably closest to what
the final animation should have been.
Finally, we get to the big main() function, serving as the duct
tape that holds this game together. It may read rather disorganized with all
the (actually necessary) assignments and function calls, but the only
actual minor issue I've seen there is that you're robbed of any
pellet destroy bonus collected on the final frame of the final boss. There
is a certain charm in directly nesting the infinite main gameplay loop
within the infinite per-life loop within the infinite stage loop. But come
on, why is there no fourth scene loop? Instead, the
game just starts a new REIIDEN.EXE process before and after a
boss fight. With all the wildly mutated global state, that was probably a
much saner choice.
The final secrets can be found in the debug stage selection. ZUN
implemented the prompts using the C standard library's scanf()
function, which is the natural choice for quick-and-dirty testing features
like this one. However, the C standard library is also complete and utter
trash, and so it's not surprising that both of the scanf()
calls do… well, probably not what ZUN intended. The guaranteed out-of-bounds
memory access in the select_flag route prompt thankfully has no
real effect on the game, but it gets really interesting with the 面数 stage prompt.
Back in 2020, I already wrote about
📝 stages 21-24, and how they're loaded from actual data that ZUN shipped with the game.
As it now turns out, the code that maps stage IDs to STAGE?.DAT
scene numbers contains an explicit branch that maps any (1-based) stage
number ≥21 to scene 7. Does this mean that an Extra Stage was indeed planned
at some point? That branch seems way too specific to just be meant as a
fallback. Maybe
Asprey was on to something after all…
However, since ZUN passed the stage ID as a signed integer to
scanf(), you can also enter negative numbers. The only place
that kind of accidentally checks for them is the aforementioned stage
ID → scene mapping, which ensures that (1-based) stages < 5 use
the shrine's background image and BGM. With no checks anywhere else, we get
a new set of "glitch stages":
Stage -1Stage -2Stage -3Stage -4Stage -5
The scene loading function takes the entered 0-based stage ID value modulo
5, so these 4 are the only ones that "exist", and lower stage numbers will
simply loop around to them. When loading these stages, the function accesses
the data in REIIDEN.EXE that lies before the statically
allocated 5-element stages-of-scene array, which happens to encompass
Borland C++'s locale and exception handling data, as well as a small bit of
ZUN's global variables. In particular, the obstacle/card HP on the tile I
highlighted in green corresponds to the
lowest byte of the 32-bit RNG seed. If it weren't for that and the fact that
the obstacles/card HP on the few tiles before are similarly controlled by
the x86 segment values of certain initialization function addresses, these
glitch stages would be completely deterministic across PC-98 systems, and
technically canon…
Stage -4 is the only playable one here as it's the only stage to end up
below the
📝 heap corruption limit of 102 stage objects.
Completing it loads Stage -3, which crashes with a Divide Error
just like it does if it's directly selected. Unsurprisingly, this happens
because all 50 card bytes at that memory location are 0, so one division (or
in this case, modulo operation) by the number of cards is enough to crash
the game.
Stage -5 is modulo'd to 0 and thus loads the first regular stage. The only
apparent broken element there is the timer, which is handled by a completely
different function that still operates with a (0-based) stage ID value of
-5. Completing the stage loads Stage -4, which also crashes, but only
because its 61 cards naturally cause the
📝 stack overflow in the flip-in animation for any stage with more than 50 cards.
And that's REIIDEN.EXE, the biggest and most bloated PC-98
Touhou executable, fully decompiled! Next up: Finishing this game with the
main menu, and hoping I'll actually pull it off within 24 hours. (If I do,
we might all have to thank 32th
System, who independently decompiled half of the remaining 14
functions…)
Oh look, it's another rather short and straightforward boss with a rather
small number of bugs and quirks. Yup, contrary to the character's
popularity, Mima's premiere is really not all that special in terms of code,
and continues the trend established with
📝 Kikuri and
📝 SinGyoku. I've already covered
📝 the initial sprite-related bugs last November,
so this post focuses on the main code of the fight itself. The overview:
The TH01 Mima fight consists of 3 phases, with phases 1 and 3 each
corresponding to one half of the 12-HP bar.
📝 Just like with SinGyoku, the distinction
between the red-white and red parts is purely visual once again, and doesn't
reflect anything about the boss script. As usual, all of the phases have to
be completed in order.
Phases 1 and 3 cycle through 4 danmaku patterns each, for a total of 8.
The cycles always start on a fixed pattern.
3 of the patterns in each phase feature rotating white squares, thus
introducing a new sprite in need of being unblitted.
Phase 1 additionally features the "hop pattern" as the last one in its
cycle. This is the only pattern where Mima leaves the seal in the center of
the playfield to hop from one edge of the playfield towards the other, while
also moving slightly higher up on the Y axis, and staying on the final
position for the next pattern cycle. For the first time, Mima selects a
random starting edge, which is then alternated on successive cycles.
Since the square entities are local to the respective pattern function,
Phase 1 can only end once the current pattern is done, even if Mima's HP are
already below 6. This makes Mima susceptible to the
📝 test/debug mode HP bar heap corruption bug.
Phase 2 simply consists of a spread-in teleport back to Mima's initial
position in the center of the playfield. This would only have been strictly
necessary if phase 1 ended on the hop pattern, but is done regardless of the
previous pattern, and does provide a nice visual separation between the two
main phases.
That's it – nothing special in Phase 3.
And there aren't even any weird hitboxes this time. What is maybe
special about Mima, however, is how there's something to cover about all of
her patterns. Since this is TH01, it's won't surprise anyone that the
rotating square patterns are one giant copy-pasta of unblitting, updating,
and rendering code. At least ZUN placed the core polar→Cartesian
transformation in a separate function for creating regular polygons
with an arbitrary number of sides, which might hint toward some more varied
shapes having been planned at one point?
5 of the 6 patterns even follow the exact same steps during square update
frames:
Calculate square corner coordinates
Unblit the square
Update the square angle and radius
Use the square corner coordinates for spawning pellets or missiles
Recalculate square corner coordinates
Render the square
Notice something? Bullets are spawned before the corner coordinates
are updated. That's why their initial positions seem to be a bit off – they
are spawned exactly in the corners of the square, it's just that it's
the square from 8 frames ago.
Mima's first pattern on Normal difficulty.
Once ZUN reached the final laser pattern though, he must have noticed that
there's something wrong there… or maybe he just wanted to fire those
lasers independently from the square unblit/update/render timer for a
change. Spending an additional 16 bytes of the data segment for conveniently
remembering the square corner coordinates across frames was definitely a
decent investment.
When Mima isn't shooting bullets from the corners of a square or hopping
across the playfield, she's raising flame pillars from the bottom of the playfield within very specifically calculated
random ranges… which are then rendered at byte-aligned VRAM positions, while
collision detection still uses their actual pixel position. Since I don't
want to sound like a broken record all too much, I'll just direct you to
📝 Kikuri, where we've seen the exact same issue with the teardrop ripple sprites.
The conclusions are identical as well.
Mima's flame pillar pattern. This video was recorded on a particularly
unlucky seed that resulted in great disparities between a pillar's
internal X coordinate and its byte-aligned on-screen appearance, leading
to lots of right-shifted hitboxes.
Also note how the change from the meteor animation to the three-arm 🚫
casting sprite doesn't unblit the meteor, and leaves that job to
any sprite that happens to fly over those pixels.
However, I'd say that the saddest part about this pattern is how choppy it
is, with the circle/pillar entities updating and rendering at a meager 7
FPS. Why go that low on purpose when you can just make the game render ✨
smoothly ✨ instead?
So smooth it's almost uncanny.
The reason quickly becomes obvious: With TH01's lack of optimization, going
for the full 56.4 FPS would have significantly slowed down the game on its
intended 33 MHz CPUs, requiring more than cheap surface-level ASM
optimization for a stable frame rate. That might very well have been ZUN's
reason for only ever rendering one circle per frame to VRAM, and designing
the pattern with these time offsets in mind. It's always been typical for
PC-98 developers to target the lowest-spec models that could possibly still
run a game, and implementing dynamic frame rates into such an engine-less
game is nothing I would wish on anybody. And it's not like TH01 is
particularly unique in its choppiness anyway; low frame rates are actually a
rather typical part of the PC-98 game aesthetic.
The final piece of weirdness in this fight can be found in phase 1's hop
pattern, and specifically its palette manipulation. Just from looking at the
pattern code itself, each of the 4 hops is supposed to darken the hardware
palette by subtracting #444 from every color. At the last hop,
every color should have therefore been reduced to a pitch-black
#000, leaving the player completely blind to the movement of
the chasing pellets for 30 frames and making the pattern quite ghostly
indeed. However, that's not what we see in the actual game:
Nothing in the pattern's code would cause the hardware palette to get
brighter before the end of the pattern, and yet…
The expected version doesn't look all too unfair, even on Lunatic…
well, at least at the default rank pellet speed shown in this
video. At maximum pellet speed, it is in fact rather brutal.
Looking at the frame counter, it appears that something outside the
pattern resets the palette every 40 frames. The only known constant with a
value of 40 would be the invincibility frames after hitting a boss with the
Orb, but we're not hitting Mima here…
But as it turns out, that's exactly where the palette reset comes from: The
hop animation darkens the hardware palette directly, while the
📝 infamous 12-parameter boss collision handler function
unconditionally resets the hardware palette to the "default boss palette"
every 40 frames, regardless of whether the boss was hit or not. I'd classify
this as a bug: That function has no business doing periodic hardware palette
resets outside the invincibility flash effect, and it completely defies
common sense that it does.
That explains one unexpected palette change, but could this function
possibly also explain the other infamous one, namely, the temporary green
discoloration in the Konngara fight? That glitch comes down to how the game
actually uses two global "default" palettes: a default boss
palette for undoing the invincibility flash effect, and a default
stage palette for returning the colors back to normal at the end of
the bomb animation or when leaving the Pause menu. And sure enough, the
stage palette is the one with the green color, while the boss
palette contains the intended colors used throughout the fight. Sending the
latter palette to the graphics chip every 40 frames is what corrects
the discoloration, which would otherwise be permanent.
The green color comes from BOSS7_D1.GRP, the scrolling
background of the entrance animation. That's what turns this into a clear
bug: The stage palette is only set a single time in the entire fight,
at the beginning of the entrance animation, to the palette of this image.
Apart from consistency reasons, it doesn't even make sense to set the stage
palette there, as you can't enter the Pause menu or bomb during a blocking
animation function.
And just 3 lines of code later, ZUN loads BOSS8_A1.GRP, the
main background image of the fight. Moving the stage palette assignment
there would have easily prevented the discoloration.
But yeah, as you can tell, palette manipulation is complete jank in this
game. Why differentiate between a stage and a boss palette to begin with?
The blocking Pause menu function could have easily copied the original
palette to a local variable before darkening it, and then restored it after
closing the menu. It's not so easy for bombs as the intended palette could
change between the start and end of the animation, but the code could have
still been simplified a lot if there was just one global "default palette"
variable instead of two. Heck, even the other bosses who manipulate their
palettes correctly only do so because they manually synchronize the two
after every change. The proper defense against bugs that result from wild
mutation of global state is to get rid of global state, and not to put up
safety nets hidden in the middle of existing effect code.
The easiest way of reproducing the green discoloration bug in
the TH01 Konngara fight, timed to show the maximum amount of time the
discoloration can possibly last.
In any case, that's Mima done! 7th PC-98 Touhou boss fully
decompiled, 24 bosses remaining, and 59 functions left in all of TH01.
In other thrilling news, my call for secondary funding priorities in new
TH01 contributions has given us three different priorities so far. This
raises an interesting question though: Which of these contributions should I
now put towards TH01 immediately, and which ones should I leave in the
backlog for the time being? Since I've never liked deciding on priorities,
let's turn this into a popularity contest instead: The contributions with
the least popular secondary priorities will go towards TH01 first, giving
the most popular priorities a higher chance to still be left over after TH01
is done. As of this delivery, we'd have the following popularity order:
TH05 (1.67 pushes), from T0182
Seihou (1 push), from T0184
TH03 (0.67 pushes), from T0146
Which means that T0146 will be consumed for TH01 next, followed by T0184 and
then T0182. I only assign transactions immediately before a delivery though,
so you all still have the chance to change up these priorities before the
next one.
Next up: The final boss of TH01 decompilation, YuugenMagan… if the current
or newly incoming TH01 funds happen to be enough to cover the entire fight.
If they don't turn out to be, I will have to pass the time with some Seihou
work instead, missing the TH01 anniversary deadline as a result.Edit (2022-07-18): Thanks to Yanga for
securing the funding for YuugenMagan after all! That fight will feature
slightly more than half of all remaining code in TH01's
REIIDEN.EXE and the single biggest function in all of PC-98
Touhou, let's go!
More than 50% of all PC-98 Touhou game code has now been
reverse-engineered! 🎉 While this number isn't equally distributed among the
games, we've got one game very close to 100% and reverse-engineered most of
the core features of two others. During the last 32 months of continuous
funding, I've averaged an overall speed of 1.11% total RE per month. That
looks like a decent prediction of how much more time it will take for 100%
across all games – unless, of course, I'd get to work towards some of the
non-RE goals in the meantime.
70 functions left in TH01, with less than 10,000 ASM instructions
remaining! Due to immense hype, I've temporarily raised the cap by 50% until
August 15. With the last TH01 pushes delivering at roughly 1.5× of the
currently calculated average speed, that should be more than enough to get
TH01 done – especially since I expect YuugenMagan to come with lots of
redundant code. Therefore, please also request a secondary priority for
these final TH01 RE contributions.
So, how did this card-flipping stage obstacle delivery get so horribly
delayed? With all the different layouts showcased in the 28 card-flipping
stages, you'd expect this to be among the more stable and bug-free parts of
the codebase. Heck, with all stage objects being placed on a 32×32-pixel
grid, this is the first TH01-related blog post this year that doesn't have
to describe an alignment-related unblitting glitch!
That alone doesn't mean that this code is free from quirky behavior though,
and we have to look no further than the first few lines of the collision
handling for round bumpers to already find a whole lot of that. Simplified,
they do the following:
Immediately, you wonder why these assignments only exist for the Y
coordinate. Sure, hitting a bumper from the left or right side should happen
less often, but it's definitely possible. Is it really a good idea to warp
the Orb to the top or bottom edge of a bumper regardless?
What's more important though: The fact that these immediate assignments
exist at all. The game's regular Orb physics work by producing a Y velocity
from the single force acting on the Orb and a gravity factor, and are
completely independent of its current Y position. A bumper collision does
also apply a new force onto the Orb further down in the code, but these
assignments still bypass the physics system and are bound to have
some knock-on effect on the Orb's movement.
To observe that effect, we just have to enter Stage 18 on the 地獄/Jigoku route, where it's particularly trivial to
reproduce. At a 📝 horizontal velocity of ±4,
these assignments are exactly what can cause the Orb to endlessly
bounce between two bumpers. As rudimentary as the Orb's physics may be, just
letting them do their work would have entirely prevented these loops:
One of at least three infinite bumper loop constellations within just
this 10×5-tile section of TH01's Stage 18 on the 地獄/Jigoku route. With an effective 56 horizontal
pixels between both hitboxes, the Orb would have to travel an absolute
Y distance of at least 16 vertical pixels within
(56 / 4) = 14 frames to escape the
other bumper's hitbox. If the initial bounce reduces the Orb's Y
velocity far enough for it to not manage that distance the first time,
it will never reach the necessary speed again. In this loop, the
bounce-off force even stabilizes, though this doesn't have to happen.
The blue areas indicate the pixel-perfect* hitboxes of each bumper.
TH01 bumper collision handling without ZUN's manual assignment of the Y
coordinate. The Orb still bounces back and forth between two bumpers
for a while, but its top position always follows naturally
from its Y velocity and the force applied to it, and gravity wins out
in the end. The blue areas indicate the pixel-perfect* hitboxes of each bumper.
Now, you might be thinking that these Y assignments were just an attempt to
prevent the Orb from colliding with the same bumper again on the next frame.
After all, those 24 pixels exactly correspond to ⅓ of the height of a
bumper's hitbox with an additional pixel added on top. However, the game
already perfectly prevents repeated collisions by turning off collision
testing with the same bumper for the next 7 frames after a collision. Thus,
we can conclude that ZUN either explicitly coded bumper collision handling
to facilitate these loops, or just didn't take out that code after
inevitably discovering what it did. This is not janky code, it's not a
glitch, it's not sarcasm from my end, and it's not the game's physics being
bad.
But wait. Couldn't these assignments just be a remnant from a time in
development before ZUN decided on the 7-frame delay on further
collisions? Well, even that explanation stops holding water after the next
few lines of code. Simplified, again:
What's important here is the part that's not in the code – namely,
anything that handles X velocities of -8 or +8. In those cases, the Orb
simply continues in the same horizontal direction. The manual Y assignment
is the only part of the code that actually prevents a collision there, as
the newly applied force is not guaranteed to be enough:
An infinite loop across three bumpers, made possible by the edge of the
playfield and bumper bars on opposite sides, an unchanged horizontal
direction, and the Y assignments neatly placing the Orb on either the
top or bottom side of a bumper. The alternating sign of the force
further ensures that the Orb will travel upwards half the time,
canceling out gravity during the short time between two hitboxes.
With the unchanged horizontal direction and the Y assignments removed,
nothing keeps an Orb at ±8 pixels per frame from flying into/over a
bumper. The collision force pushes the Orb slightly, but not enough to
truly matter. The final force sends the Orb on a significant downward
trajectory beyond the next bumper's hitbox, breaking the original loop.
Forgetting to handle ⅖ of your discrete X velocity cases is simply not
something you do by accident. So we might as well say that ZUN deliberately
designed the game to behave exactly as it does in this regard.
Bumpers also come in vertical or horizontal bar shapes. Their collision
handling also turns off further collision testing for the next 7 frames, and
doesn't do any manual coordinate assignment. That's definitely a step up in
cleanliness from round bumpers, but it doesn't seem to keep in mind that the
player can fire a new shot every 4 frames when standing still. That makes it
immediately obvious why this works:
The green numbers show the amount of
frames since the last detected collision with the respective bumper bar,
and indicate that collision testing with the bar below is currently
disabled.
That's the most well-known case of reducing the Orb's horizontal velocity to
0 by exactly hitting it with shots in its center and then button-mashing it
through a horizontal bar. This also works with vertical bars and yields even
more interesting results there, but if we want to have any chance of
understanding what happens there, we have to first go over some basics:
Collision detection for all stage obstacles is done in row-major
order from the top-left to the bottom-right corner of the
playfield.
All obstacles are collision-tested independently from each other, with
the collision response code immediately following the test.
The hitboxes for bumper bars extend far past their 32×32 sprites to make
sure that the Orb can collide with them from any side. They are a
pixel-perfect* 87×56 pixels for horizontal bars, and 57×87 pixels for
vertical ones. Yes, that's no typo, they really do differ in one pixel.
Changing the Y velocity during such a collision just involves applying a
new force with the magnitude of the negated current Y velocity, which can be
done multiple times during a frame without changing the result. This
explains why the force is correctly inverted in the clip above, despite the
Orb colliding with two bumpers simultaneously.
Lacking a similar force system, the X coordinate is simply directly
inverted.
However, if that were everything the game did, kicking the Orb into a column
of vertical bumper bars would lead them to behave more like a rope that the
Orb can climb, as the initial collision with two hitboxes cancels out the
intended sign change that reflects the Orb away from the bars:
This footage was recorded without the workaround I am about to describe.
It does not reflect the behavior of the original game. You
cannot do this in the original game.
While the visualization reveals small sections where three hitboxes
overlap, the Orb can never actually collide with three of them at the
same time, as those 3-hitbox regions are 2 pixels smaller than they
would need to be to fit the Orb. That's exactly the difference between
using < rather than <= in these hitbox
comparisons.
While that would have been a fun gameplay mechanic on its own, it
immediately breaks apart once you place two vertical bumper bars next to
each other. Due to how these bumper bar hitboxes extend past their sprites,
any two adjacent vertical bars will end up with the exact same hitbox in
absolute screen coordinates. Stage 17 on the
魔界/Makai route contains exactly such a layout:
The collision handlers of adjacent vertical bars always activate in the
same frame, independently invert the Orb's X velocity, and therefore
fully cancel out their intended effect on the Orb… if the game did not
have the workaround I am about to describe. This cannot happen
in the original game.
ZUN's workaround: Setting a "vertical bumper bar block flag" after any
collision with such a bar, which simply disables any collision with
any vertical bar for the next 7 frames. This quick hack made all
vertical bars work as intended, and avoided the need for involving the Orb's
X velocity in any kind of physics system.
Edit (2022-07-12): This flag only works around glitches
that would be caused by simultaneously colliding with more than one vertical
bar. The actual response to a bumper bar collision still remains unaffected,
and is very naive:
Horizontal bars always invert the Orb's Y velocity
Vertical bars invert either the Y or X velocity depending on whether
the Orb's current X velocity is 0 (Y) or not (X)
These conditions are only correct if the Orb comes in at an angle roughly
between 45° and 135° on either side of a bar. If it's anywhere close to 0°
or 180°, this response will be incorrect, and send the Orb straight
through the bar. Since the large hitboxes make this easily possible, you can
still get the Orb to climb a vertical column, or glide along a horizontal
row:
Here's the hitbox overlay for
地獄/Jigoku Stage 19, and here's an updated
version of the 📝 Orb physics debug mod that
now also shows bumper bar collision frame numbers:
2022-07-10-TH01OrbPhysicsDebug.zip
See the th01_orb_debug
branch for the code. To use it, simply replace REIIDEN.EXE, and
run the game in debug mode, via game d on the DOS prompt. If you
encounter a gameplay situation that doesn't seem to be covered by this blog
post, you can now verify it for yourself. Thanks to touhou-memories for bringing these
issues to my attention! That definitely was a glaring omission from the
initial version of this blog post.
With that clarified, we can now try mashing the Orb into these two vertical
bars:
At first, that workaround doesn't seem to make a difference here. As we
expect, the frame numbers now tell us that only one of the two bumper bars
in a row activates, but we couldn't have told otherwise as the number of
bars has no effect on newly applied Y velocity forces. On a closer look, the
Orb's rise to the top of the playfield is in fact caused by that
workaround though, combined with the unchanged top-to-bottom order of
collision testing. As soon as any bumper bar completed its 7
collision delay frames, it resets the aforementioned flag, which already
reactivates collision handling for any remaining vertical bumper bars during
the same frame. Look out for frames with both a 7 and a 1, like the one marked in the video above:
The 7 will always appear before
the 1 in the row-major order. Whenever
this happens, the current oscillation period is cut down from 7 to 6
frames – and because collision testing runs from top to bottom, this will
always happen during the falling part. Depending on the Y velocity, the
rising part may also be cut down to 6 frames from time to time, but that one
at least has a chance to last for the full 7 frames. This difference
adds those crucial extra frames of upward movement, which add up to send the
Orb to the top. Without the flag, you'd always see the Orb oscillating
between a fixed range of the bar column.
Finally, it's the "top of playfield" force that gradually slows down the Orb
and makes sure it ultimately only moves at sub-pixel velocities, which have
no visible effect. Because
📝 the regular effect of gravity is reset with
each newly applied force, it's completely negated during most of the climb.
This even holds true once the Orb reached the top: Since the Orb requires a
negative force to repeatedly arrive up there and be bounced back, this force
will stay active for the first 5 of the 7 collision frames and not move the
Orb at all. Once gravity kicks in at the 5th frame and adds 1 to
the Y velocity, it's already too late: The new velocity can't be larger than
0.5, and the Orb only has 1 or 2 frames before the flag reset causes it to
be bounced back up to the top again.
Portals, on the other hand, turn out to be much simpler than the old
description that ended up on Touhou Wiki in October 2005 might suggest.
Everything about their teleportations is random: The destination portal, the
exit force (as an integer between -9 and +9), as well as the exit X
velocity, with each of the
📝 5 distinct horizontal velocities having an
equal chance of being chosen. Of course, if the destination portal is next
to the left or right edge of the playfield and it chooses to fire the Orb
towards that edge, it immediately bounces off into the opposite direction,
whereas the 0 velocity is always selected with a constant 20% probability.
The selection process for the destination portal involves a bit more than a
single rand() call. The game bundles all obstacles in a single
structure of dynamically allocated arrays, and only knows how many obstacles
there are in total, not per type. Now, that alone wouldn't have much
of an impact on random portal selection, as you could simply roll a random
obstacle ID and try again if it's not a portal. But just to be extra cute,
ZUN instead iterates over all obstacles, selects any non-entered portal with
a chance of ¼, and just gives up if that dice roll wasn't successful after
16 loops over the whole array, defaulting to the entered portal in that
case.
In all its silliness though, this works perfectly fine, and results in a
chance of 0.7516(𝑛 - 1) for the Orb exiting out of the
same portal it entered, with 𝑛 being the total number of portals in a
stage. That's 1% for two portals, and 0.01% for three. Pretty decent for a
random result you don't want to happen, but that hurts nobody if it does.
The one tiny ZUN bug with portals is technically not even part of the newly
decompiled code here. If Reimu gets hit while the Orb is being sent through
a portal, the Orb is immediately kicked out of the portal it entered, no
matter whether it already shows up inside the sprite of the destination
portal. Neither of the two portal sprites is reset when this happens,
leading to "two Orbs" being visible simultaneously.
This makes very little sense no matter how you look at it. The Orb doesn't
receive a new velocity or force when this happens, so it will simply
re-enter the same portal once the gameplay resumes on Reimu's next life:
That left another ½ of a push over at the end. Way too much time to finish
FUUIN.exe, way too little time to start with Mima… but the bomb
animation fit perfectly in there. No secrets or bugs there, just a bunch of
sprite animation code wasting at least another 82 bytes in the data segment.
The special effect after the kuji-in sprites uses the same single-bitplane
32×32 square inversion effect seen at the end of Kikuri's and Sariel's
entrance animation, except that it's a 3-stack of 16-rings moving at 6, 7,
and 8 pixels per frame respectively. At these comparatively slow speeds, the
byte alignment of each square adds some further noise to the discoloration
pattern… if you even notice it below all the shaking and seizure-inducing
hardware palette manipulation.
And yes, due to the very destructive nature of the effect, the game does in
fact rely on it only being applied to VRAM page 0. While that will cause
every moving sprite to tear holes into the inverted squares along its
trajectory, keeping a clean playfield on VRAM page 1 is what allows all that
pixel damage to be easily undone at the end of this 89-frame animation.
Next up: Mima! Let's hope that stage obstacles already were the most complex
part remaining in TH01…
With Elis, we've not only reached the midway point in TH01's boss code, but
also a bunch of other milestones: Both REIIDEN.EXE and TH01 as
a whole have crossed the 75% RE mark, and overall position independence has
also finally cracked 80%!
And it got done in 4 pushes again? Yup, we're back to
📝 Konngara levels of redundancy and
copy-pasta. This time, it didn't even stop at the big copy-pasted code
blocks for the rift sprite and 256-pixel circle animations, with the words
"redundant" and "unnecessary" ending up a total of 18 times in my source
code comments.
But damn is this fight broken. As usual with TH01 bosses, let's start with a
high-level overview:
The Elis fight consists of 5 phases (excluding the entrance animation),
which must be completed in order.
In all odd-numbered phases, Elis uses a random one-shot danmaku pattern
from an exclusive per-phase pool before teleporting to a random
position.
There are 3 exclusive girl-form patterns per phase, plus 4
additional bat-form patterns in phase 5, for a total of 13.
Due to a quirk in the selection algorithm in phases 1 and 3, there
is a 25% chance of Elis skipping an attack cycle and just teleporting
again.
In contrast to Konngara, Elis can freely select the same pattern
multiple times in a row. There's nothing in the code to prevent that
from happening.
This pattern+teleport cycle is repeated until Elis' HP reach a certain
threshold value. The odd-numbered phases correspond to the white (phase 1),
red-white (phase 3), and red (phase 5) sections of the health bar. However,
the next phase can only start at the end of each cycle, after a
teleport.
Phase 2 simply teleports Elis back to her starting screen position of
(320, 144) and then advances to phase 3.
Phase 4 does the same as phase 2, but adds the initial bat form
transformation before advancing to phase 5.
Phase 5 replaces the teleport with a transformation to the bat form.
Rather than teleporting instantly to the target position, the bat gradually
flies there, firing a randomly selected looping pattern from the 4-pattern
bat pool on the way, before transforming back to the girl form.
This puts the earliest possible end of the fight at the first frame of phase
5. However, nothing prevents Elis' HP from reaching 0 before that point. You
can nicely see this in 📝 debug mode: Wait
until the HP bar has filled up to avoid heap corruption, hold ↵ Return
to reduce her HP to 0, and watch how Elis still goes through a total of
two patterns* and four
teleport animations before accepting defeat.
But wait, heap corruption? Yup, there's a bug in the HP bar that already
affected Konngara as well, and it isn't even just about the graphical
glitches generated by negative HP:
The initial fill-up animation is drawn to both VRAM pages at a rate of 1
HP per frame… by passing the current frame number as the
current_hp number.
The target_hp is indicated by simply passing the current
HP…
… which, however, can be reduced in debug mode at an equal rate of up to
1 HP per frame.
The completion condition only checks if
((target_hp - 1) == current_hp). With the
right timing, both numbers can therefore run past each other.
In that case, the function is repeatedly called on every frame, backing
up the original VRAM contents for the current HP point before blitting
it…
… until frame ((96 / 2) + 1), where the
.PTN slot pointer overflows the heap buffer and overwrites whatever comes
after. 📝 Sounds familiar, right?
Since Elis starts with 14 HP, which is an even number, this corruption is
trivial to cause: Simply hold ↵ Return from the beginning of the
fight, and the completion condition will never be true, as the
HP and frame numbers run past the off-by-one meeting point.
Edit (2023-07-21): Pressing ↵ Return to reduce HP
also works in test mode (game t). There, the game doesn't
even check the heap, and consequently won't report any corruption,
allowing the HP bar to be glitched even further.
Regular gameplay, however, entirely prevents this due to the fixed start
positions of Reimu and the Orb, the Orb's fixed initial trajectory, and the
50 frames of delay until a bomb deals damage to a boss. These aspects make
it impossible to hit Elis within the first 14 frames of phase 1, and ensure
that her HP bar is always filled up completely. So ultimately, this bug ends
up comparable in seriousness to the
📝 recursion / stack overflow bug in the memory info screen.
These wavy teleport animations point to a quite frustrating architectural
issue in this fight. It's not even the fact that unblitting the yellow star
sprites rips temporary holes into Elis' sprite; that's almost expected from
TH01 at this point. Instead, it's all because of this unused frame of the
animation:
With this sprite still being part of BOSS5.BOS, Girl-Elis has a
total of 9 animation frames, 1 more than the
📝 8 per-entity sprites allowed by ZUN's architecture.
The quick and easy solution would have been to simply bump the sprite array
size by 1, but… nah, this would have added another 20 bytes to all 6 of the
.BOS image slots. Instead, ZUN wrote the manual
position synchronization code I mentioned in that 2020 blog post.
Ironically, he then copy-pasted this snippet of code often enough that it
ended up taking up more than 120 bytes in the Elis fight alone – with, you
guessed it, some of those copies being redundant. Not to mention that just
going from 8 to 9 sprites would have allowed ZUN to go down from 6 .BOS
image slots to 3. That would have actually saved 420 bytes in
addition to the manual synchronization trouble. Looking forward to SinGyoku,
that's going to be fun again…
As for the fight itself, it doesn't take long until we reach its most janky
danmaku pattern, right in phase 1:
The "pellets along circle" pattern on Lunatic, in its original version
and with fanfiction fixes for everything that can potentially be
interpreted as a bug.
For whatever reason, the lower-right quarter of the circle isn't
animated? This animation works by only drawing the new dots added with every
subsequent animation frame, expressed as a tiny arc of a dotted circle. This
arc starts at the animation's current 8-bit angle and ends on the sum of
that angle and a hardcoded constant. In every other (copy-pasted, and
correct) instance of this animation, ZUN uses 0x02 as the
constant, but this one uses… 0.05 for the lower-right quarter?
As in, a 64-bit double constant that truncates to 0 when added
to an 8-bit integer, thus leading to the start and end angles being
identical and the game not drawing anything.
On Easy and Normal, the pattern then spawns 32 bullets along the outline
of the circle, no problem there. On Lunatic though, every one of these
bullets is instead turned into a narrow-angled 5-spread, resulting in 160
pellets… in a game with a pellet cap of 100.
Now, if Elis teleported herself to a position near the top of the playfield,
most of the capped pellets would have been clipped at that top edge anyway,
since the bullets are spawned in clockwise order starting at Elis' right
side with an angle of 0x00. On lower positions though, you can
definitely see a difference if the cap were high enough to allow all coded
pellets to actually be spawned.
The Hard version gets dangerously close to the cap by spawning a total of 96
pellets. Since this is the only pattern in phase 1 that fires pellets
though, you are guaranteed to see all of the unclipped ones.
The pellets also aren't spawned exactly on the telegraphed circle, but 4 pixels to the left.
Then again, it might very well be that all of this was intended, or, most
likely, just left in the game as a happy accident. The latter interpretation
would explain why ZUN didn't just delete the rendering calls for the
lower-right quarter of the circle, because seriously, how would you not spot
that? The phase 3 patterns continue with more minor graphical glitches that
aren't even worth talking about anymore.
And then Elis transforms into her bat form at the beginning of Phase 5,
which displays some rather unique hitboxes. The one against the Orb is fine,
but the one against player shots…
… uses the bat's X coordinate for both X and Y dimensions.
In regular gameplay, it's not too bad as most
of the bat patterns fire aimed pellets which typically don't allow you to
move below her sprite to begin with. But if you ever tried destroying these
pellets while standing near the middle of the playfield, now you know why
that didn't work. This video also nicely points out how the bat, like any
boss sprite, is only ever blitted at positions on the 8×1-pixel VRAM byte
grid, while collision detection uses the actual pixel position.
The bat form patterns are all relatively simple, with little variation
depending on the difficulty level, except for the "slow pellet spreads"
pattern. This one is almost easiest to dodge on Lunatic, where the 5-spreads
are not only always fired downwards, but also at the hardcoded narrow delta
angle, leaving plenty of room for the player to move out of the way:
The "slow pellet spreads" pattern of Elis' bat form, on every
difficulty. Which version do you think is the easiest one?
Finally, we've got another potential timesave in the girl form's "safety
circle" pattern:
After the circle spawned completely, you lose a life by moving outside it,
but doing that immediately advances the pattern past the circle part. This
part takes 200 frames, but the defeat animation only takes 82 frames, so
you can save up to 118 frames there.
Final funny tidbit: As with all dynamic entities, this circle is only
blitted to VRAM page 0 to allow easy unblitting. However, it's also kind of
static, and there needs to be some way to keep the Orb, the player shots,
and the pellets from ripping holes into it. So, ZUN just re-blits the circle
every… 4 frames?! 🤪 The same is true for the Star of David and its
surrounding circle, but there you at least get a flash animation to justify
it. All the overlap is actually quite a good reason for not even attempting
to 📝 mess with the hardware color palette instead.
Reproducing the crash was the whole challenge here. Even after moving Elis
and Reimu to the exact positions seen in Pearl's video and setting Elis' HP
to 0 on the exact same frame, everything ran fine for me. It's definitely no
division by 0 this time, the function perfectly guards against that
possibility. The line specified in the function's parameters is always
clipped to the VRAM region as well, so we can also rule out illegal memory
accesses here…
… or can we? Stepping through it all reminded me of how this function brings
unblitting sloppiness to the next level: For each VRAM byte touched, ZUN
actually unblits the 4 surrounding bytes, adding one byte to the left
and two bytes to the right, and using a single 32-bit read and write per
bitplane. So what happens if the function tries to unblit the topmost byte
of VRAM, covering the pixel positions from (0, 0) to (7, 0)
inclusive? The VRAM offset of 0x0000 is decremented to
0xFFFF to cover the one byte to the left, 4 bytes are written
to this address, the CPU's internal offset overflows… and as it turns out,
that is illegal even in Real Mode as of the 80286, and will raise a General Protection
Fault. Which is… ignored by DOSBox-X,
every Neko Project II version in common use, the CSCP
emulators, SL9821, and T98-Next. Only Anex86 accurately emulates the
behavior of real hardware here.
OK, but no laser fired by Elis ever reaches the top-left corner of the
screen. How can such a fault even happen in practice? That's where the
broken laser reset+unblit function comes in: Not only does it just flat out pass the wrong
parameters to the line unblitting function – describing the line
already traveled by the laser and stopping where the laser begins –
but it also passes them
wrongly, in the form of raw 32-bit fixed-point Q24.8 values, with no
conversion other than a truncation to the signed 16-bit pixels expected by
the function. What then follows is an attempt at interpolation and clipping
to find a line segment between those garbage coordinates that actually falls
within the boundaries of VRAM:
right/bottom correspond to a laser's origin position, and
left/top to the leftmost pixel of its moved-out top line. The
bug therefore only occurs with lasers that stopped growing and have started
moving.
Moreover, it will only happen if either (left % 256) or
(right % 256) is ≤ 127 and the other one of the two is ≥ 128.
The typecast to signed 16-bit integers then turns the former into a large
positive value and the latter into a large negative value, triggering the
function's clipping code.
The function then follows Bresenham's
algorithm: left is ensured to be smaller than right
by swapping the two values if necessary. If that happened, top
and bottom are also swapped, regardless of their value – the
algorithm does not care about their order.
The slope in the X dimension is calculated using an integer division of
((bottom - top) /
	(right - left))
. Both subtractions are done on signed
16-bit integers, and overflow accordingly.
(-left × slope_x) is added to top,
and left is set to 0.
If both top and bottom are < 0 or
≥ 640, there's nothing to be unblitted. Otherwise, the final
coordinates are clipped to the VRAM range of [(0, 0),
(639, 399)].
If the function got this far, the line to be unblitted is now very
likely to reach from
the top-left to the bottom-right corner, starting out at
(0, 0) right away, or
from the bottom-left corner to the top-right corner. In this case,
you'd expect unblitting to end at (639, 0), but thanks to an
off-by-one error,
it actually ends at (640, -1), which is equivalent to
(0, 0). Why add clipping to VRAM offset calculations when
everything else is clipped already, right?
Possible laser states that will cause the fault, with some debug
output to help understand the cause, and any pellets removed for better
readability. This can happen for all bosses that can potentially have
shootout lasers on screen when being defeated, so it also applies to Mima.
Fixing this is easier than understanding why it happens, but since y'all
love reading this stuff…
tl;dr: TH01 has a high chance of freezing at a boss defeat sequence if there
are diagonally moving lasers on screen, and if your PC-98 system
raises a General Protection Fault on a 4-byte write to offset
0xFFFF, and if you don't run a TSR with an INT
0Dh handler that might handle this fault differently.
The easiest fix option would be to just remove the attempted laser
unblitting entirely, but that would also have an impact on this game's…
distinctive visual glitches, in addition to touching a whole lot of
code bytes. If I ever get funded to work on a hypothetical TH01 Anniversary
Edition that completely rearchitects the game to fix all these glitches, it
would be appropriate there, but not for something that purports to be the
original game.
(Sidenote to further hype up this Anniversary Edition idea for PC-98
hardware owners: With the amount of performance left on the table at every
corner of this game, I'm pretty confident that we can get it to work
decently on PC-98 models with just an 80286 CPU.)
Since we're in critical infrastructure territory once again, I went for the
most conservative fix with the least impact on the binary: Simply changing
any VRAM offsets >= 0xFFFD to 0x0000 to avoid
the GPF, and leaving all other bugs in place. Sure, it's rather lazy and
"incorrect"; the function still unblits a 32-pixel block there, but adding a
special case for blitting 24 pixels would add way too much code. And
seriously, it's not like anything happens in the 8 pixels between
(24, 0) and (31, 0) inclusive during gameplay to begin with.
To balance out the additional per-row if() branch, I inlined
the VRAM page change I/O, saving two function calls and one memory write per
unblitted row.
That means it's time for a new community_choice_fixes
build, containing the new definitive bugfixed versions of these games:
2022-05-31-community-choice-fixes.zip
Check the th01_critical_fixes
branch for the modified TH01 code. It also contains a fix for the HP bar
heap corruption in test or debug mode – simply changing the ==
comparison to <= is enough to avoid it, and negative HP will
still create aesthetic glitch art.
Once again, I then was left with ½ of a push, which I finally filled with
some FUUIN.EXE code, specifically the verdict screen. The most
interesting part here is the player title calculation, which is quite
sneaky: There are only 6 skill levels, but three groups of
titles for each level, and the title you'll see is picked from a random
group. It looks like this is the first time anyone has documented the
calculation?
As for the levels, ZUN definitely didn't expect players to do particularly
well. With a 1cc being the standard goal for completing a Touhou game, it's
especially funny how TH01 expects you to continue a lot: The code has
branches for up to 21 continues, and the on-screen table explicitly leaves
room for 3 digits worth of continues per 5-stage scene. Heck, these
counts are even stored in 32-bit long variables.
Next up: 📝 Finally finishing the long
overdue Touhou Patch Center MediaWiki update work, while continuing with
Kikuri in the meantime. Originally I wasn't sure about what to do between
Elis and Seihou,
but with Ember2528's surprise
contribution last week, y'all have
demonstrated more than enough interest in the idea of getting TH01 done
sooner rather than later. And I agree – after all, we've got the 25th
anniversary of its first public release coming up on August 15, and I might
still manage to completely decompile this game by that point…
Here we go, TH01 Sariel! This is the single biggest boss fight in all of
PC-98 Touhou: If we include all custom effect code we previously decompiled,
it amounts to a total of 10.31% of all code in TH01 (and 3.14%
overall). These 8 pushes cover the final 8.10% (or 2.47% overall),
and are likely to be the single biggest delivery this project will ever see.
Considering that I only managed to decompile 6.00% across all games in 2021,
2022 is already off to a much better start!
So, how can Sariel's code be that large? Well, we've got:
16 danmaku patterns; including the one snowflake detonating into a giant
94×32 hitbox
Gratuitous usage of floating-point variables, bloating the binary thanks
to Turbo C++ 4.0J's particularly horrid code generation
The hatching birds that shoot pellets
3 separate particle systems, sharing the general idea, overall code
structure, and blitting algorithm, but differing in every little detail
The "gust of wind" background transition animation
5 sets of custom monochrome sprite animations, loaded from
BOSS6GR?.GRC
A further 3 hardcoded monochrome 8×8 sprites for the "swaying leaves"
pattern during the second form
In total, it's just under 3,000 lines of C++ code, containing a total of 8
definite ZUN bugs, 3 of them being subpixel/pixel confusions. That might not
look all too bad if you compare it to the
📝 player control function's 8 bugs in 900 lines of code,
but given that Konngara had 0… (Edit (2022-07-17):
Konngara contains two bugs after all: A
📝 possible heap corruption in test or debug mode,
and the infamous
📝 temporary green discoloration.)
And no, the code doesn't make it obvious whether ZUN coded Konngara or
Sariel first; there's just as much evidence for either.
Some terminology before we start: Sariel's first form is separated
into four phases, indicated by different background images, that
cycle until Sariel's HP reach 0 and the second, single-phase form
starts. The danmaku patterns within each phase are also on a cycle,
and the game picks a random but limited number of patterns per phase before
transitioning to the next one. The fight always starts at pattern 1 of phase
1 (the random purple lasers), and each new phase also starts at its
respective first pattern.
Sariel's bugs already start at the graphics asset level, before any code
gets to run. Some of the patterns include a wand raise animation, which is
stored in BOSS6_2.BOS:
Umm… OK? The same sprite twice, just with slightly different
colors? So how is the wand lowered again?
The "lowered wand" sprite is missing in this file simply because it's
captured from the regular background image in VRAM, at the beginning of the
fight and after every background transition. What I previously thought to be
📝 background storage code has therefore a
different meaning in Sariel's case. Since this captured sprite is fully
opaque, it will reset the entire 128×128 wand area… wait, 128×128, rather
than 96×96? Yup, this lowered sprite is larger than necessary, wasting 1,967
bytes of conventional memory. That still doesn't quite explain the
second sprite in BOSS6_2.BOS though. Turns out that the black
part is indeed meant to unblit the purple reflection (?) in the first
sprite. But… that's not how you would correctly unblit that?
The first sprite already eats up part of the red HUD line, and the second
one additionally fails to recover the seal pixels underneath, leaving a nice
little black hole and some stray purple pixels until the next background
transition. Quite ironic given that both
sprites do include the right part of the seal, which isn't even part of the
animation.
Just like Konngara, Sariel continues the approach of using a single function
per danmaku pattern or custom entity. While I appreciate that this allows
all pattern- and entity-specific state to be scoped locally to that one
function, it quickly gets ugly as soon as such a function has to do more than one thing.
The "bird function" is particularly awful here: It's just one if(…)
{…} else if(…) {…} else if(…) {…} chain with different
branches for the subfunction parameter, with zero shared code between any of
these branches. It also uses 64-bit floating-point double as
its subpixel type… and since it also takes four of those as parameters
(y'know, just in case the "spawn new bird" subfunction is called), every
call site has to also push four double values onto the stack.
Thanks to Turbo C++ even using the FPU for pushing a 0.0 constant, we
have already reached maximum floating-point decadence before even having
seen a single danmaku pattern. Why decadence? Every possible spawn position
and velocity in both bird patterns just uses pixel resolution, with no
fractional component in sight. And there goes another 720 bytes of
conventional memory.
Speaking about bird patterns, the red-bird one is where we find the first
code-level ZUN bug: The spawn cross circle sprite suddenly disappears after
it finished spawning all the bird eggs. How can we tell it's a bug? Because
there is code to smoothly fly this sprite off the playfield, that
code just suddenly forgets that the sprite's position is stored in Q12.4
subpixels, and treats it as raw screen pixels instead.
As a result, the well-intentioned 640×400
screen-space clipping rectangle effectively shrinks to 38×23 pixels in the
top-left corner of the screen. Which the sprite is always outside of, and
thus never rendered again.
The intended animation is easily restored though:
Sariel's third pattern, and the first to spawn birds, in its original
and fixed versions. Note that I somewhat fixed the bird hatch animation
as well: ZUN's code never unblits any frame of animation there, and
simply blits every new one on top of the previous one.
Also, did you know that birds actually have a quite unfair 14×38-pixel
hitbox? Not that you'd ever collide with them in any of the patterns…
Another 3 of the 8 bugs can be found in the symmetric, interlaced spawn rays
used in three of the patterns, and the 32×32 debris "sprites" shown at their endpoint, at
the edge of the screen. You kinda have to commend ZUN's attention to detail
here, and how he wrote a lot of code for those few rapidly animated pixels
that you most likely don't
even notice, especially with all the other wrong pixels
resulting from rendering glitches. One of the bugs in the very final pattern
of phase 4 even turns them into the vortex sprites from the second pattern
in phase 1 during the first 5 frames of
the first time the pattern is active, and I had to single-step the blitting
calls to verify it.
It certainly was annoying how much time I spent making sense of these bugs,
and all weird blitting offsets, for just a few pixels… Let's look at
something more wholesome, shall we?
So far, we've only seen the PC-98 GRCG being used in RMW (read-modify-write)
mode, which I previously
📝 explained in the context of TH01's red-white HP pattern.
The second of its three modes, TCR (Tile Compare Read), affects VRAM reads
rather than writes, and performs "color extraction" across all 4 bitplanes:
Instead of returning raw 1bpp data from one plane, a VRAM read will instead
return a bitmask, with a 1 bit at every pixel whose full 4-bit color exactly
matches the color at that offset in the GRCG's tile register, and 0
everywhere else. Sariel uses this mode to make sure that the 2×2 particles
and the wind effect are only blitted on top of "air color" pixels, with
other parts of the background behaving like a mask. The algorithm:
Set the GRCG to TCR mode, and all 8 tile register dots to the air
color
Read N bits from the target VRAM position to obtain an N-bit mask where
all 1 bits indicate air color pixels at the respective position
AND that mask with the alpha plane of the sprite to be drawn, shifted to
the correct start bit within the 8-pixel VRAM byte
Set the GRCG to RMW mode, and all 8 tile register dots to the color that
should be drawn
Write the previously obtained bitmask to the same position in VRAM
Quite clever how the extracted colors double as a secondary alpha plane,
making for another well-earned good-code tag. The wind effect really doesn't deserve it, though:
ZUN calculates every intermediate result inside this function
over and over and over again… Together with some ugly
pointer arithmetic, this function turned into one of the most tedious
decompilations in a long while.
This gradual effect is blitted exclusively to the front page of VRAM,
since parts of it need to be unblitted to create the illusion of a gust of
wind. Then again, anything that moves on top of air-colored background –
most likely the Orb – will also unblit whatever it covered of the effect…
As far as I can tell, ZUN didn't use TCR mode anywhere else in PC-98 Touhou.
Tune in again later during a TH04 or TH05 push to learn about TDW, the final
GRCG mode!
Speaking about the 2×2 particle systems, why do we need three of them? Their
only observable difference lies in the way they move their particles:
Up or down in a straight line (used in phases 4 and 2,
respectively)
Left or right in a straight line (used in the second form)
Left and right in a sinusoidal motion (used in phase 3, the "dark
orange" one)
Out of all possible formats ZUN could have used for storing the positions
and velocities of individual particles, he chose a) 64-bit /
double-precision floating-point, and b) raw screen pixels. Want to take a
guess at which data type is used for which particle system?
If you picked double for 1) and 2), and raw screen pixels for
3), you are of course correct! Not that I'm implying
that it should have been the other way round – screen pixels would have
perfectly fit all three systems use cases, as all 16-bit coordinates
are extended to 32 bits for trigonometric calculations anyway. That's what,
another 1.080 bytes of wasted conventional memory? And that's even
calculated while keeping the current architecture, which allocates
space for 3×30 particles as part of the game's global data, although only
one of the three particle systems is active at any given time.
That's it for the first form, time to put on "Civilization
of Magic"! Or "死なばもろとも"? Or "Theme of 地獄めくり"? Or whatever SYUGEN is
supposed to mean…
… and the code of these final patterns comes out roughly as exciting as
their in-game impact. With the big exception of the very final "swaying
leaves" pattern: After 📝 Q4.4,
📝 Q28.4,
📝 Q24.8, and double variables,
this pattern uses… decimal subpixels? Like, multiplying the number by
10, and using the decimal one's digit to represent the fractional part?
Well, sure, if you really insist on moving the leaves in cleanly
represented integer multiples of ⅒, which is infamously impossible in IEEE
754. Aside from aesthetic reasons, it only really combines less precision
(10 possible fractions rather than the usual 16) with the inferior
performance of having to use integer divisions and multiplications rather
than simple bit shifts. And it's surely not because the leaf sprites needed
an extended integer value range of [-3276, +3276], compared to
Q12.4's [-2047, +2048]: They are clipped to 640×400 screen space
anyway, and are removed as soon as they leave this area.
This pattern also contains the second bug in the "subpixel/pixel confusion
hiding an entire animation" category, causing all of
BOSS6GR4.GRC to effectively become unused:
The "swaying leaves" pattern. ZUN intended a splash animation to be
shown once each leaf "spark" reaches the top of the playfield, which is
never displayed in the original game.
At least their hitboxes are what you would expect, exactly covering the
30×30 pixels of Reimu's sprite. Both animation fixes are available on the th01_sariel_fixes
branch.
After all that, Sariel's main function turned out fairly unspectacular, just
putting everything together and adding some shake, transition, and color
pulse effects with a bunch of unnecessary hardware palette changes. There is
one reference to a missing BOSS6.GRP file during the
first→second form transition, suggesting that Sariel originally had a
separate "first form defeat" graphic, before it was replaced with just the
shaking effect in the final game.
Speaking about the transition code, it is kind of funny how the… um,
imperative and concrete nature of TH01 leads to these 2×24
lines of straight-line code. They kind of look like ZUN rattling off a
laundry list of subsystems and raw variables to be reinitialized, making
damn sure to not forget anything.
Whew! Second PC-98 Touhou boss completely decompiled, 29 to go, and they'll
only get easier from here! 🎉 The next one in line, Elis, is somewhere
between Konngara and Sariel as far as x86 instruction count is concerned, so
that'll need to wait for some additional funding. Next up, therefore:
Looking at a thing in TH03's main game code – really, I have little
idea what it will be!
Now that the store is open again, also check out the
📝 updated RE progress overview I've posted
together with this one. In addition to more RE, you can now also directly
order a variety of mods; all of these are further explained in the order
form itself.
Of course, Sariel's potentially bloated and copy-pasted code is blocked by
even more definitely bloated and copy-pasted code. It's TH01, what did you
expect?
But even then, TH01's item code is on a new level of software architecture
ridiculousness. First, ZUN uses distinct arrays for both types of items,
with their own caps of 4 for bomb items, and 10 for point items. Since that
obviously makes any type-related switch statement redundant,
he also used distinct functions for both types, with copy-pasted
boilerplate code. The main per-item update and render function is
shared though… and takes every single accessed member of the item
structure as its own reference parameter. Like, why, you have a
structure, right there?! That's one way to really practice the C++ language
concept of passing arbitrary structure fields by mutable reference…
To complete the unwarranted grand generic design of this function, it calls
back into per-type collision detection, drop, and collect functions with
another three reference parameters. Yeah, why use C++ virtual methods when
you can also implement the effectively same polymorphism functionality by
hand? Oh, and the coordinate clamping code in one of these callbacks could
only possibly have come from nested min() and
max() preprocessor macros. And that's how you extend such
dead-simple functionality to 1¼ pushes…
Amidst all this jank, we've at least got a sensible item↔player hitbox this
time, with 24 pixels around Reimu's center point to the left and right, and
extending from 24 pixels above Reimu down to the bottom of the playfield.
It absolutely didn't look like that from the initial naive decompilation
though. Changing entity coordinates from left/top to center was one of the
better lessons from TH01 that ZUN implemented in later games, it really
makes collision detection code much more intuitive to grasp.
The card flip code is where we find out some slightly more interesting
aspects about item drops in this game, and how they're controlled by a
hidden cycle variable:
At the beginning of every 5-stage scene, this variable is set to a
random value in the [0..59] range
Point items are dropped at every multiple of 10
Every card flip adds 1 to its value after this mod 10
check
At a value of 140, the point item is replaced with a bomb item, but only
if no damaging bomb is active. In any case, its value is then reset to
1.
Then again, score players largely ignore point items anyway, as card
combos simply have a much bigger effect on the score. With this, I should
have RE'd all information necessary to construct a tool-assisted score run,
though? Edit: Turns out that 1) point items are becoming
increasingly important in score runs, and 2) Pearl already did a TAS some
months ago. Thanks to
spaztron64 for the info!
The Orb↔card hitbox also makes perfect sense, with 24 pixels around
the center point of a card in every direction.
The rest of the code confirms the
card
flip score formula documented on Touhou Wiki, as well as the way cards
are flipped by bombs: During every of the 90 "damaging" frames of the
140-frame bomb animation, there is a 75% chance to flip the card at the
[bomb_frame % total_card_count_in_stage] array index. Since
stages can only have up to 50 cards
📝 thanks to a bug, even a 75% chance is high
enough to typically flip most cards during a bomb. Each of these flips
still only removes a single card HP, just like after a regular collision
with the Orb.
Also, why are the card score popups rendered before the cards
themselves? That's two needless frames of flicker during that 25-frame
animation. Not all too noticeable, but still.
And that's over 50% of REIIDEN.EXE decompiled as well! Next
up: More HUD update and rendering code… with a direct dependency on
rank pellet speed modifications?
📝 7 pushes to get Konngara done, according to my previous estimate?
Well, how about being twice as fast, and getting the entire boss fight done
in 3.5 pushes instead? So much copy-pasted code in there… without any
flashy unused content, apart from four calculations with an unclear purpose. And the three strings "ANGEL", "OF",
"DEATH", which were probably meant to be rendered using those giant
upscaled font ROM glyphs that also display the
STAGE # and
HARRY UP strings? Those three strings
are also part of Sariel's code, though.
On to the remaining 11 patterns then! Konngara's homing snakes, shown in
the video above, are one of the more notorious parts of this battle. They
occur in two patterns – one with two snakes and one with four – with
all of the spawn, aim, update, and render code copy-pasted between
the two. Three gameplay-related discoveries
here:
The homing target is locked once the Y position of a snake's white head
diamond is below 300 pixels.
That diamond is also the only one with collision detection…
…but comes with a gigantic 30×30 pixel hitbox, reduced to 30×20 while
Reimu is sliding. For comparison: Reimu's regular sprite is 32×32 pixels,
including transparent areas. This time, there is a clearly defined
hitbox around Reimu's center pixel that the single top-left pixel can
collide with. No imagination necessary, which people apparently
📝 still prefer over actually understanding an
algorithm… Then again, this hitbox is still not intuitive at all,
because…
… the exact collision pixel, marked in
red, is part of the diamond sprite's
transparent background
This was followed by really weird aiming code for the "sprayed
pellets from cup" pattern… which can only possibly have been done on
purpose, but is sort of mitigated by the spraying motion anyway.
After a bunch of long if(…) {…} else if(…) {…} else if(…)
{…} chains, which remain quite popular in certain corners of
the game dev scene to this day, we've got the three sword slash
patterns as the final notable ones. At first, it seemed as if ZUN just
improvised those raw number constants involved in the pellet spawner's
movement calculations to describe some sort of path that vaguely
resembles the sword slash. But once I tried to express these numbers in
terms of the slash animation's keyframes, it all worked out perfectly, and
resulted in this:
Yup, the spawner always takes an exact path along this triangle. Sometimes,
I wonder whether I should just rush this project and don't bother about
naming these repeated number literals. Then I gain insights like these, and
it's all worth it.
Finally, we've got Konngara's main function, which coordinates the entire
fight. Third-longest function in both TH01 and all of PC-98 Touhou, only
behind some player-related stuff and YuugenMagan's gigantic main function…
and it's even more of a copy-pasta, making it feel not nearly as long as it
is. Key insights there:
The fight consists of 7 phases, with the entire defeat sequence being
part of the if(boss_phase == 7) {…}
branch.
The three even-numbered phases, however, only light up the Siddhaṃ seed
syllables and then progress to the next phase.
Odd-numbered phases are completed after passing an HP threshold or after
seeing a predetermined number of patterns, whatever happens first. No
possibility of skipping anything there.
Patterns are chosen randomly, but the available pool of patterns
is limited to 3 specific "easier" patterns in phases 1 and 5, and 4 patterns
in phase 3. Once Phase 7 is reached at 9 HP remaining, all 12 patterns can
potentially appear. Fittingly, that's also the point where the red section
of the HP bar starts.
Every time a pattern is chosen, the code only makes a maximum of two
attempts at picking a pattern that's different from the one that
Konngara just completed. Therefore, it seems entirely possible to see
the same pattern twice. Calculating an actual seed to prove that is out
of the scope of this project, though.
Due to what looks like a copy-paste mistake, the pool for the second
RNG attempt in phases 5 and 7 is reduced to only the first two patterns
of the respective phases? That's already quite some bias right there,
and we haven't even analyzed the RNG in detail yet…
(For anyone interested, it's a
LCG,
using the Borland C/C++ parameters as shown here.)
The difficulty level only affects the speed and firing intervals (and
thus, number) of pellets, as well as the number of lasers in the one pattern
that uses them.
After the 📝 kuji-in defeat sequence, the
fight ends in an attempted double-free of Konngara's image
data. Thankfully, the format-specific
_free() functions defend against such a thing.
And that's it for Konngara! First boss with not a single piece of ASM left,
30 more to go! 🎉 But wait, what about the cause behind the temporary green
discoloration after leaving the Pause menu? I expected to find something on
that as well, but nope, it's nothing in Konngara's code segment. We'll
probably only get to figure that out near the very end of TH01's
decompilation, once we get to the one function that directly calls all of
the boss-specific main functions in a switch statement. Edit (2022-07-17):📝 Only took until Mima.
So, Sariel next? With half of a push left, I did cover Sariel's first few
initialization functions, but all the sprite unblitting and HUD
manipulation will need some extra attention first. The first one of these
functions is related to the HUD, the stage timer, and the
HARRY UP mode, whose pellet pattern I've
also decompiled now.
All of this brings us past 75% PI in all games, and TH01 to under 30,000
remaining ASM instructions, leaving TH03 as the now most expensive game to
be completely decompiled. Looking forward to how much more TH01's code will
fall apart if you just tap it lightly… Next up: The aforementioned helper
functions related to HARRY UP, drawing the
HUD, and unblitting the other bosses whose sprites are a bit more animated.
50% hype! 🎉 But as usual for TH01, even that final set of functions
shared between all bosses had to consume two pushes rather than one…
First up, in the ongoing series "Things that TH01 draws to the PC-98
graphics layer that really should have been drawn to the text layer
instead": The boss HP bar. Oh well, using the graphics layer at least made
it possible to have this half-red, half-white pattern
for the middle section.
This one pattern is drawn by making surprisingly good use of the GRCG. So
far, we've only seen it used for fast monochrome drawing:
// Setting up fast drawing using color #9 (1001 in binary)
grcg_setmode(GC_RMW);
outportb(0x7E, 0xFF); // Plane 0: (B): (********)
outportb(0x7E, 0x00); // Plane 1: (R): (        )
outportb(0x7E, 0x00); // Plane 2: (G): (        )
outportb(0x7E, 0xFF); // Plane 3: (E): (********)

// Write a checkerboard pattern (* * * * ) in color #9 to the top-left corner,
// with transparent blanks. Requires only 1 VRAM write to a single bitplane:
// The GRCG automatically writes to the correct bitplanes, as specified above
*(uint8_t *)(MK_FP(0xA800, 0)) = 0xAA;
But since this is actually an 8-pixel tile register, we can set any
8-pixel pattern for any bitplane. This way, we can get different colors
for every one of the 8 pixels, with still just a single VRAM write of the
alpha mask to a single bitplane:
And I thought TH01 only suffered the drawbacks of PC-98 hardware, making
so little use of its actual features that it's perhaps not fair to even
call it "a PC-98 game"… Still, I'd say that "bad PC-98 port of an idea"
describes it best.
However, after that tiny flash of brilliance, the surrounding HP rendering
code goes right back to being the typical sort of confusing TH01 jank.
There's only a single function for the three distinct jobs of
incrementing HP during the boss entrance animation,
decrementing HP if hit by the Orb, and
redrawing the entire bar, because it's still all in VRAM, and Sariel
wants different backgrounds,
with magic numbers to select between all of these.
VRAM of course also means that the backgrounds behind the individual hit
points have to be stored, so that they can be unblitted later as the boss
is losing HP. That's no big deal though, right? Just allocate some memory,
copy what's initially in VRAM, then blit it back later using your
foundational set of blitting funct– oh, wait, TH01 doesn't have this sort
of thing, right The closest thing,
📝 once again, are the .PTN functions. And
so, the game ends up handling these 8×16 background sprites with 16×16
wrappers around functions for 32×32 sprites.
That's quite the recipe for confusion, especially since ZUN
preferred copy-pasting the necessary ridiculous arithmetic expressions for
calculating positions, .PTN sprite IDs, and the ID of the 16×16 quarter
inside the 32×32 sprite, instead of just writing simple helper functions.
He did manage to make the result mostly bug-free this time
around, though! (Edit (2022-05-31): Nope, there's a
📝 potential heap corruption after all, which can be triggered in some fights in test mode (game t) or debug mode (game d).)
There's one minor hit point discoloration bug if the red-white or white
sections start at an odd number of hit points, but that's never the case for
any of the original 7 bosses.
The remaining sloppiness is ultimately inconsequential as well: The game
always backs up twice the number of hit point backgrounds, and thus
uses twice the amount of memory actually required. Also, this
self-restriction of only unblitting 16×16 pixels at a time requires any
remaining odd hit point at the last position to, of course, be rendered
again
After stumbling over the weakest imaginable random number
generator, we finally arrive at the shared boss↔orb collision
handling function, the final blocker among the final blockers. This
function takes a whopping 12 parameters, 3 of them being references to
int values, some of which are duplicated for every one of the
7 bosses, with no generic boss struct anywhere.
📝 Previously, I speculated that YuugenMagan might have been the first boss to be programmed for TH01.
With all these variables though, there is some new evidence that SinGyoku
might have been the first one after all: It's the only boss to use its own
HP and phase frame variables, with the other bosses sharing the same two
globals.
While this function only handles the response to a boss↔orb
collision, it still does way too much to describe it briefly. Took me
quite a while to frame it in terms of invincibility (which is the
main impact of all of this that can be observed in gameplay code). That
made at least some sort of sense, considering the other usages of
the variables passed as references to that function. Turns out that
YuugenMagan, Kikuri, and Elis abuse what's meant to be the "invincibility
frame" variable as a frame counter for some of their animations 🙄
Oh well, the game at least doesn't call the collision handling function
during those, so "invincibility frame" is technically still a
correct variable name there.
And that's it! We're finally ready to start with Konngara, in 2021. I've
been waiting quite a while for this, as all this high-level boss code is
very likely to speed up TH01 progress quite a bit. Next up though: Closing
out 2020 with more of the technical debt in the other games.
 or
or  items. In reality, there is
very little randomness at play here: These items are picked from a
hardcoded, repeating ring of 10 items
(𝄆
items. In reality, there is
very little randomness at play here: These items are picked from a
hardcoded, repeating ring of 10 items
(𝄆  item instead –
which translates to 1/1536 enemies due to the
fixed drop rate.
item instead –
which translates to 1/1536 enemies due to the
fixed drop rate.
 items, are scripted and deterministic.
 items instead.
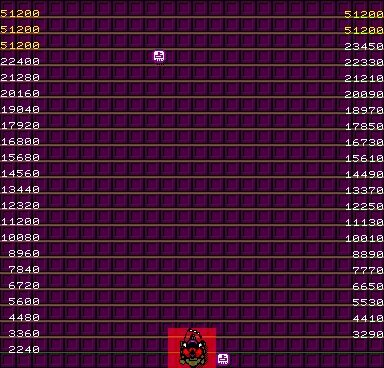

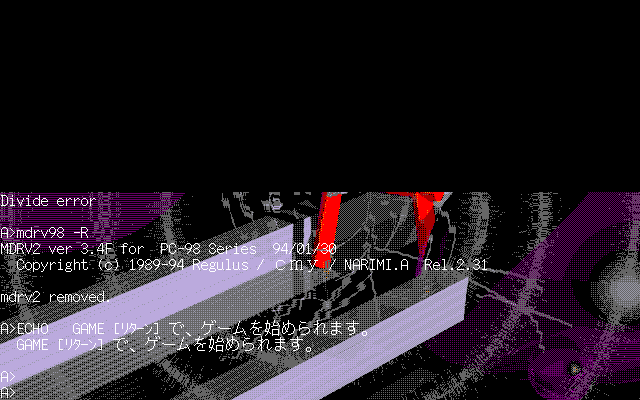
 from the bottom of the playfield within very specifically calculated
random ranges… which are then rendered at byte-aligned VRAM positions, while
collision detection still uses their actual pixel position. Since I don't
want to sound like a broken record all too much, I'll just direct you to
from the bottom of the playfield within very specifically calculated
random ranges… which are then rendered at byte-aligned VRAM positions, while
collision detection still uses their actual pixel position. Since I don't
want to sound like a broken record all too much, I'll just direct you to

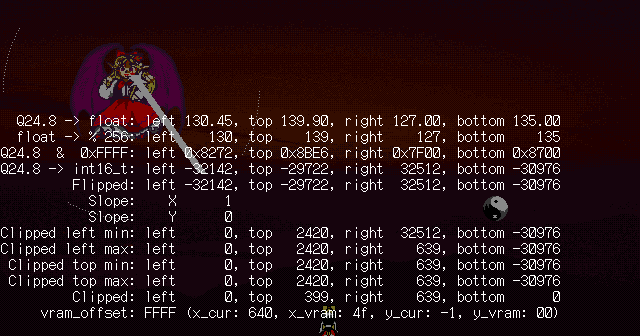


 shown at their endpoint, at
the edge of the screen. You kinda have to commend ZUN's attention to detail
here, and how he wrote a lot of code for those few rapidly animated pixels
that you most likely
shown at their endpoint, at
the edge of the screen. You kinda have to commend ZUN's attention to detail
here, and how he wrote a lot of code for those few rapidly animated pixels
that you most likely  during the first 5 frames of
the first time the pattern is active, and I had to single-step the blitting
calls to verify it.
during the first 5 frames of
the first time the pattern is active, and I had to single-step the blitting
calls to verify it.
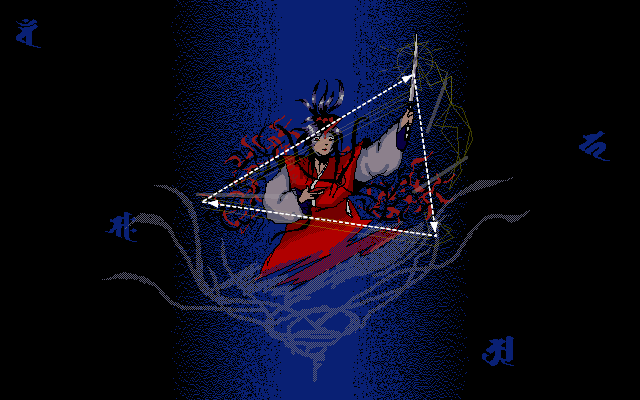
 for the middle section.