📝 7 pushes to get Konngara done, according to my previous estimate?
Well, how about being twice as fast, and getting the entire boss fight done
in 3.5 pushes instead? So much copy-pasted code in there… without any
flashy unused content, apart from four calculations with an unclear purpose. And the three strings "ANGEL", "OF",
"DEATH", which were probably meant to be rendered using those giant
upscaled font ROM glyphs that also display the
STAGE # and
HARRY UP strings? Those three strings
are also part of Sariel's code, though.
On to the remaining 11 patterns then! Konngara's homing snakes, shown in
the video above, are one of the more notorious parts of this battle. They
occur in two patterns – one with two snakes and one with four – with
all of the spawn, aim, update, and render code copy-pasted between
the two. Three gameplay-related discoveries
here:
The homing target is locked once the Y position of a snake's white head
diamond is below 300 pixels.
That diamond is also the only one with collision detection…
…but comes with a gigantic 30×30 pixel hitbox, reduced to 30×20 while
Reimu is sliding. For comparison: Reimu's regular sprite is 32×32 pixels,
including transparent areas. This time, there is a clearly defined
hitbox around Reimu's center pixel that the single top-left pixel can
collide with. No imagination necessary, which people apparently
📝 still prefer over actually understanding an
algorithm… Then again, this hitbox is still not intuitive at all,
because…
… the exact collision pixel, marked in
red, is part of the diamond sprite's
transparent background
This was followed by really weird aiming code for the "sprayed
pellets from cup" pattern… which can only possibly have been done on
purpose, but is sort of mitigated by the spraying motion anyway.
After a bunch of long if(…) {…} else if(…) {…} else if(…)
{…} chains, which remain quite popular in certain corners of
the game dev scene to this day, we've got the three sword slash
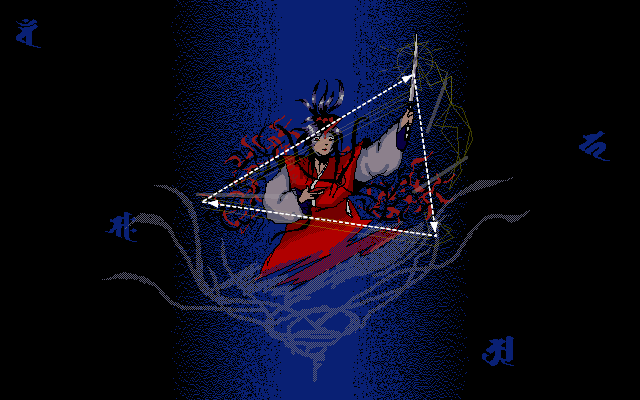
patterns as the final notable ones. At first, it seemed as if ZUN just
improvised those raw number constants involved in the pellet spawner's
movement calculations to describe some sort of path that vaguely
resembles the sword slash. But once I tried to express these numbers in
terms of the slash animation's keyframes, it all worked out perfectly, and
resulted in this:
Yup, the spawner always takes an exact path along this triangle. Sometimes,
I wonder whether I should just rush this project and don't bother about
naming these repeated number literals. Then I gain insights like these, and
it's all worth it.
Finally, we've got Konngara's main function, which coordinates the entire
fight. Third-longest function in both TH01 and all of PC-98 Touhou, only
behind some player-related stuff and YuugenMagan's gigantic main function…
and it's even more of a copy-pasta, making it feel not nearly as long as it
is. Key insights there:
The fight consists of 7 phases, with the entire defeat sequence being
part of the if(boss_phase == 7) {…}
branch.
The three even-numbered phases, however, only light up the Siddhaṃ seed
syllables and then progress to the next phase.
Odd-numbered phases are completed after passing an HP threshold or after
seeing a predetermined number of patterns, whatever happens first. No
possibility of skipping anything there.
Patterns are chosen randomly, but the available pool of patterns
is limited to 3 specific "easier" patterns in phases 1 and 5, and 4 patterns
in phase 3. Once Phase 7 is reached at 9 HP remaining, all 12 patterns can
potentially appear. Fittingly, that's also the point where the red section
of the HP bar starts.
Every time a pattern is chosen, the code only makes a maximum of two
attempts at picking a pattern that's different from the one that
Konngara just completed. Therefore, it seems entirely possible to see
the same pattern twice. Calculating an actual seed to prove that is out
of the scope of this project, though.
Due to what looks like a copy-paste mistake, the pool for the second
RNG attempt in phases 5 and 7 is reduced to only the first two patterns
of the respective phases? That's already quite some bias right there,
and we haven't even analyzed the RNG in detail yet…
(For anyone interested, it's a
LCG,
using the Borland C/C++ parameters as shown here.)
The difficulty level only affects the speed and firing intervals (and
thus, number) of pellets, as well as the number of lasers in the one pattern
that uses them.
After the 📝 kuji-in defeat sequence, the
fight ends in an attempted double-free of Konngara's image
data. Thankfully, the format-specific
_free() functions defend against such a thing.
And that's it for Konngara! First boss with not a single piece of ASM left,
30 more to go! 🎉 But wait, what about the cause behind the temporary green
discoloration after leaving the Pause menu? I expected to find something on
that as well, but nope, it's nothing in Konngara's code segment. We'll
probably only get to figure that out near the very end of TH01's
decompilation, once we get to the one function that directly calls all of
the boss-specific main functions in a switch statement. Edit (2022-07-17):📝 Only took until Mima.
So, Sariel next? With half of a push left, I did cover Sariel's first few
initialization functions, but all the sprite unblitting and HUD
manipulation will need some extra attention first. The first one of these
functions is related to the HUD, the stage timer, and the
HARRY UP mode, whose pellet pattern I've
also decompiled now.
All of this brings us past 75% PI in all games, and TH01 to under 30,000
remaining ASM instructions, leaving TH03 as the now most expensive game to
be completely decompiled. Looking forward to how much more TH01's code will
fall apart if you just tap it lightly… Next up: The aforementioned helper
functions related to HARRY UP, drawing the
HUD, and unblitting the other bosses whose sprites are a bit more animated.


 Thankfully, the format-specific