🎉 After almost 3 years, TH04 finally caught up to TH05 and is now 100%
position-independent as well! 🎉
For a refresher on what this means and does not mean, check the
announcements from back in 2019 and 2020 when we chased the goal for TH05's
📝 OP.EXE and
📝 the rest of the game. These also feature
some demo videos that show off the kind of mods you were able to efficiently
code back then. With the occasional reverse-engineering attention it
received over the years, TH04's code should now be slightly easier to work
with than TH05's was back in the day. Although not by much – TH04 has
remained relatively unpopular among backers, and only received more than the
funded attention because it shares most of its core code with the more
popular TH05. Which, coincidentally, ended up becoming
📝 the reason for getting this done now.
Not that it matters a lot. Ever since we reached 100% PI for TH05, community
and backer interest in position independence has dropped to near zero. We
just didn't end up seeing the expected large amount of community-made mods
that PI was meant to facilitate, and even the
📝 100% decompilation of TH01 changed nothing
about that. But that's OK; after all, I do appreciate the business of
continually getting commissioned for all the
📝 large-scale mods. Not focusing on PI is
also the correct choice for everyone who likes reading these blog posts, as
it often means that I can't go that much into detail due to cutting corners
and piling up technical debt left and right.
Surprisingly, this only took 1.25 pushes, almost twice as fast as expected.
As that's closer to 1 push than it is to 2, I'm OK with releasing it like
this – especially since it was originally meant to come out three days ago.
🍋 Unfortunately, it was delayed thanks to surprising
website bugs and a certain piece of code that was way more difficult to
document than it was to decompile… The next push will have slightly less
content in exchange, though.
📝 P0240 and P0241 already covered the final
remaining structures, so I only needed to do some superficial RE to prove
the remaining numeric literals as either constants or memory addresses. For
example, I initially thought I'd have to decompile the dissolve animations
in the staff roll, but I only needed to identify a single function pointer
type to prove all false positives as screen coordinates there. Now, the TH04
staff roll would be another fast and cheap decompilation, similar to the
custom entity types of TH04. (And TH05 as well!)
The one piece of code I did have to decompile was Stage 4's carpet
lighting animation, thanks to hex literals that were way too complicated to
leave in ASM. And this one probably takes the crown for TH04's worst set of
landmines and bloat that still somehow results in no observable bugs or
quirks.
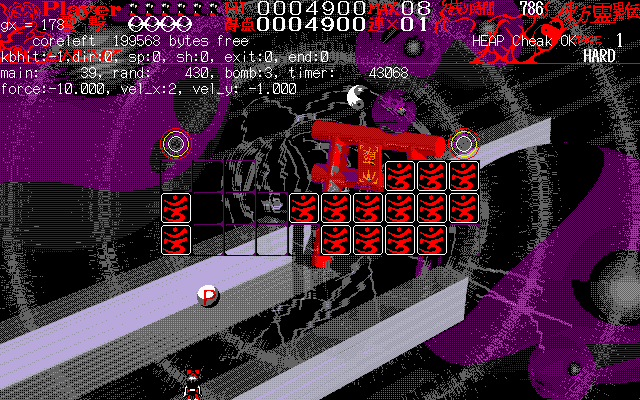
This animation starts at frame 1664, roughly 29.5 seconds into the stage,
and quickly turns the stage background into a repeated row of dark-red plaid
carpet tiles by moving out from the center of the playfield towards the
edges. Afterward, the animation repeats with a brighter set of tiles that is
then used for the rest of the stage. As I explained
📝 a while ago in the context of TH02, the
stage tile and map formats in PC-98 Touhou can't express animations, so all
of this needed to be hardcoded in the binary.
The repeating 384×16 row of carpet tiles at the beginning of TH04's
Stage 4 in all three light levels, shown twice for better visibility.
And ZUN did start out making the right decision by only using fully-lit
carpet tiles for all tile sections defined in ST03.MAP. This
way, the animation can simply disable itself after it completed, letting the
rest of the stage render normally and use new tile sections that are only
defined for the final light level. This means that the "initial" dark
version of the carpet is as much a result of hardcoded tile manipulation as
the animation itself.
But then, ZUN proceeded to implement it all by directly manipulating the
ring buffer of on-screen tiles. This is the lowest level before the tiles
are rendered, and rather detached from the defined content of the
📝 .MAP tile sections. Which leads to a whole
lot of problems:
If you decide to do this kind of tile ring modification, it should ideally
happen at a very specific point: after scrolling in new tiles into
the ring buffer, but before blitting any scrolled or invalidated
tiles to VRAM based on the ring buffer. Which is not where ZUN chose to put
it, as he placed the call to the stage-specific render function after both
of those operations. By the time the function is
called, the tile renderer has already blitted a few lines of the fully-lit
carpet tiles from the defined .MAP tile section, matching the scroll speed.
Fortunately, these are hidden behind the black TRAM cells above and below
the playfield…
Still, the code needs to get rid of them before they would become visible.
ZUN uses the regular tile invalidation function for this, which will only
cause actual redraws on the next frame. Again, the tile rendering call has
already happened by the time the Stage 4-specific rendering function gets
called.
But wait, this game also flips VRAM pages between frames to provide a
tear-free gameplay experience. This means that the intended redraw of the
new tiles actually hits the wrong VRAM page.
And sure, the code does attempt to invalidate these newly blitted lines
every frame – but only relative to the current VRAM Y coordinate that
represents the top of the hardware-scrolled screen. Once we're back on the
original VRAM page on the next frame, the lines we initially set out to
remove could have already scrolled past that point, making it impossible to
ever catch up with them in this way.
The only real "solution": Defining the height of the tile invalidation
rectangle at 3× the scroll speed, which ensures that each invalidation call
covers 3 frames worth of newly scrolled-in lines. This is not intuitive at
all, and requires an understanding of everything I have just written to even
arrive at this conclusion. Needless to say that ZUN didn't comprehend it
either, and just hardcoded an invalidation height that happened to be enough
for the small scroll speeds defined in ST03.STD for the first
30 seconds of the stage.
The effect must consistently modify the tile ring buffer to "fix" any new
tiles, overriding them with the intended light level. During the animation,
the code not only needs to set the old light level for any tiles that are
still waiting to be replaced, but also the new light level for any tiles
that were replaced – and ZUN forgot the second part. As a result, newly scrolled-in tiles within the already animated
area will "remain" untouched at light level 2 if the scroll speed is fast
enough during the transition from light level 0 to 1.
All that means that we only have to raise the scroll speed for the effect to
fall apart. Let's try, say, 4 pixels per frame rather than the original
0.25:
By hiding the text RAM layer and revealing what's below the usually
opaque black cells above and below the playfield, we can observe all
three landmines – 1) and 2) throughout light level 0, and 3) during the
transition from level 0 to 1.
All of this could have been so much simpler and actually stable if ZUN
applied the tile changes directly onto the .MAP. This is a much more
intuitive way of expressing what is supposed to happen to the map, and would
have reduced the code to the actually necessary tile changes for the first
frame and each individual frame of the animation. It would have still
required a way to force these changes into the tile ring buffer, but ZUN
could have just used his existing full-playfield redraw functions for that.
In any case, there would have been no need for any per-frame tile
fixing and redrawing. The CPU cycles saved this way could have then maybe
been put towards writing the tile-replacing part of the animation in C++
rather than ASM…
Wow, that was an unreasonable amount of research into a feature that
superficially works fine, just because its decompiled code didn't make
sense. To end on a more positive note, here are
some minor new discoveries that might actually matter to someone:
The laser part of Marisa's Illusion Laser shot type always does 3
points of damage per frame, regardless of the player's power level. Its
hitbox also remains identical on all power levels, no matter how wide the
laser appears on screen. The strength difference between the levels purely
comes from the number of frames the laser stays active before a fixed
non-damaging 32-frame cooldown time:
Power level
Frames per cycle (including 32-frame cooldown)
2
64
3
72
4
88
5
104
6
128
7
144
8
168
9
192
The decay animation for player shots is faster in TH05 (12 frames) than in
TH04 (16 frames).
In the first phase of her Stage 6 fight, Yuuka moves along one of two
randomly chosen hardcoded paths, defined as a set of 5 movement angles.
After reaching the final point and firing a danmaku pattern, she teleports
back to her initial position to repeat the path one more time before the
phase times out.
Similarly, TH04's Stage 3 midboss also goes through 12 fixed movement angles
before flying off the playfield.
The formulas for calculating the skill rating on both TH04's and TH05's
final verdict screen are going to be very long and complicated.
Next up: ¾ of a push filled with random boilerplate, finalization, and TH01
code cleanup work, while I finish the preparations for Shuusou Gyoku's
OpenGL backend. This month, everything should finally work out as intended:
I'll complete both tasks in parallel, ship the former to free up the cap,
and then ship the latter once its 5th push is fully funded.
More than 50% of all PC-98 Touhou game code has now been
reverse-engineered! 🎉 While this number isn't equally distributed among the
games, we've got one game very close to 100% and reverse-engineered most of
the core features of two others. During the last 32 months of continuous
funding, I've averaged an overall speed of 1.11% total RE per month. That
looks like a decent prediction of how much more time it will take for 100%
across all games – unless, of course, I'd get to work towards some of the
non-RE goals in the meantime.
70 functions left in TH01, with less than 10,000 ASM instructions
remaining! Due to immense hype, I've temporarily raised the cap by 50% until
August 15. With the last TH01 pushes delivering at roughly 1.5× of the
currently calculated average speed, that should be more than enough to get
TH01 done – especially since I expect YuugenMagan to come with lots of
redundant code. Therefore, please also request a secondary priority for
these final TH01 RE contributions.
So, how did this card-flipping stage obstacle delivery get so horribly
delayed? With all the different layouts showcased in the 28 card-flipping
stages, you'd expect this to be among the more stable and bug-free parts of
the codebase. Heck, with all stage objects being placed on a 32×32-pixel
grid, this is the first TH01-related blog post this year that doesn't have
to describe an alignment-related unblitting glitch!
That alone doesn't mean that this code is free from quirky behavior though,
and we have to look no further than the first few lines of the collision
handling for round bumpers to already find a whole lot of that. Simplified,
they do the following:
Immediately, you wonder why these assignments only exist for the Y
coordinate. Sure, hitting a bumper from the left or right side should happen
less often, but it's definitely possible. Is it really a good idea to warp
the Orb to the top or bottom edge of a bumper regardless?
What's more important though: The fact that these immediate assignments
exist at all. The game's regular Orb physics work by producing a Y velocity
from the single force acting on the Orb and a gravity factor, and are
completely independent of its current Y position. A bumper collision does
also apply a new force onto the Orb further down in the code, but these
assignments still bypass the physics system and are bound to have
some knock-on effect on the Orb's movement.
To observe that effect, we just have to enter Stage 18 on the 地獄/Jigoku route, where it's particularly trivial to
reproduce. At a 📝 horizontal velocity of ±4,
these assignments are exactly what can cause the Orb to endlessly
bounce between two bumpers. As rudimentary as the Orb's physics may be, just
letting them do their work would have entirely prevented these loops:
One of at least three infinite bumper loop constellations within just
this 10×5-tile section of TH01's Stage 18 on the 地獄/Jigoku route. With an effective 56 horizontal
pixels between both hitboxes, the Orb would have to travel an absolute
Y distance of at least 16 vertical pixels within
(56 / 4) = 14 frames to escape the
other bumper's hitbox. If the initial bounce reduces the Orb's Y
velocity far enough for it to not manage that distance the first time,
it will never reach the necessary speed again. In this loop, the
bounce-off force even stabilizes, though this doesn't have to happen.
The blue areas indicate the pixel-perfect* hitboxes of each bumper.
TH01 bumper collision handling without ZUN's manual assignment of the Y
coordinate. The Orb still bounces back and forth between two bumpers
for a while, but its top position always follows naturally
from its Y velocity and the force applied to it, and gravity wins out
in the end. The blue areas indicate the pixel-perfect* hitboxes of each bumper.
Now, you might be thinking that these Y assignments were just an attempt to
prevent the Orb from colliding with the same bumper again on the next frame.
After all, those 24 pixels exactly correspond to ⅓ of the height of a
bumper's hitbox with an additional pixel added on top. However, the game
already perfectly prevents repeated collisions by turning off collision
testing with the same bumper for the next 7 frames after a collision. Thus,
we can conclude that ZUN either explicitly coded bumper collision handling
to facilitate these loops, or just didn't take out that code after
inevitably discovering what it did. This is not janky code, it's not a
glitch, it's not sarcasm from my end, and it's not the game's physics being
bad.
But wait. Couldn't these assignments just be a remnant from a time in
development before ZUN decided on the 7-frame delay on further
collisions? Well, even that explanation stops holding water after the next
few lines of code. Simplified, again:
What's important here is the part that's not in the code – namely,
anything that handles X velocities of -8 or +8. In those cases, the Orb
simply continues in the same horizontal direction. The manual Y assignment
is the only part of the code that actually prevents a collision there, as
the newly applied force is not guaranteed to be enough:
An infinite loop across three bumpers, made possible by the edge of the
playfield and bumper bars on opposite sides, an unchanged horizontal
direction, and the Y assignments neatly placing the Orb on either the
top or bottom side of a bumper. The alternating sign of the force
further ensures that the Orb will travel upwards half the time,
canceling out gravity during the short time between two hitboxes.
With the unchanged horizontal direction and the Y assignments removed,
nothing keeps an Orb at ±8 pixels per frame from flying into/over a
bumper. The collision force pushes the Orb slightly, but not enough to
truly matter. The final force sends the Orb on a significant downward
trajectory beyond the next bumper's hitbox, breaking the original loop.
Forgetting to handle ⅖ of your discrete X velocity cases is simply not
something you do by accident. So we might as well say that ZUN deliberately
designed the game to behave exactly as it does in this regard.
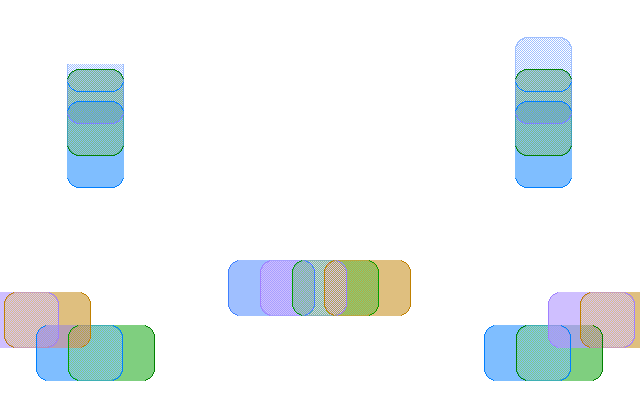
Bumpers also come in vertical or horizontal bar shapes. Their collision
handling also turns off further collision testing for the next 7 frames, and
doesn't do any manual coordinate assignment. That's definitely a step up in
cleanliness from round bumpers, but it doesn't seem to keep in mind that the
player can fire a new shot every 4 frames when standing still. That makes it
immediately obvious why this works:
The green numbers show the amount of
frames since the last detected collision with the respective bumper bar,
and indicate that collision testing with the bar below is currently
disabled.
That's the most well-known case of reducing the Orb's horizontal velocity to
0 by exactly hitting it with shots in its center and then button-mashing it
through a horizontal bar. This also works with vertical bars and yields even
more interesting results there, but if we want to have any chance of
understanding what happens there, we have to first go over some basics:
Collision detection for all stage obstacles is done in row-major
order from the top-left to the bottom-right corner of the
playfield.
All obstacles are collision-tested independently from each other, with
the collision response code immediately following the test.
The hitboxes for bumper bars extend far past their 32×32 sprites to make
sure that the Orb can collide with them from any side. They are a
pixel-perfect* 87×56 pixels for horizontal bars, and 57×87 pixels for
vertical ones. Yes, that's no typo, they really do differ in one pixel.
Changing the Y velocity during such a collision just involves applying a
new force with the magnitude of the negated current Y velocity, which can be
done multiple times during a frame without changing the result. This
explains why the force is correctly inverted in the clip above, despite the
Orb colliding with two bumpers simultaneously.
Lacking a similar force system, the X coordinate is simply directly
inverted.
However, if that were everything the game did, kicking the Orb into a column
of vertical bumper bars would lead them to behave more like a rope that the
Orb can climb, as the initial collision with two hitboxes cancels out the
intended sign change that reflects the Orb away from the bars:
This footage was recorded without the workaround I am about to describe.
It does not reflect the behavior of the original game. You
cannot do this in the original game.
While the visualization reveals small sections where three hitboxes
overlap, the Orb can never actually collide with three of them at the
same time, as those 3-hitbox regions are 2 pixels smaller than they
would need to be to fit the Orb. That's exactly the difference between
using < rather than <= in these hitbox
comparisons.
While that would have been a fun gameplay mechanic on its own, it
immediately breaks apart once you place two vertical bumper bars next to
each other. Due to how these bumper bar hitboxes extend past their sprites,
any two adjacent vertical bars will end up with the exact same hitbox in
absolute screen coordinates. Stage 17 on the
魔界/Makai route contains exactly such a layout:
The collision handlers of adjacent vertical bars always activate in the
same frame, independently invert the Orb's X velocity, and therefore
fully cancel out their intended effect on the Orb… if the game did not
have the workaround I am about to describe. This cannot happen
in the original game.
ZUN's workaround: Setting a "vertical bumper bar block flag" after any
collision with such a bar, which simply disables any collision with
any vertical bar for the next 7 frames. This quick hack made all
vertical bars work as intended, and avoided the need for involving the Orb's
X velocity in any kind of physics system.
Edit (2022-07-12): This flag only works around glitches
that would be caused by simultaneously colliding with more than one vertical
bar. The actual response to a bumper bar collision still remains unaffected,
and is very naive:
Horizontal bars always invert the Orb's Y velocity
Vertical bars invert either the Y or X velocity depending on whether
the Orb's current X velocity is 0 (Y) or not (X)
These conditions are only correct if the Orb comes in at an angle roughly
between 45° and 135° on either side of a bar. If it's anywhere close to 0°
or 180°, this response will be incorrect, and send the Orb straight
through the bar. Since the large hitboxes make this easily possible, you can
still get the Orb to climb a vertical column, or glide along a horizontal
row:
Here's the hitbox overlay for
地獄/Jigoku Stage 19, and here's an updated
version of the 📝 Orb physics debug mod that
now also shows bumper bar collision frame numbers:
2022-07-10-TH01OrbPhysicsDebug.zip
See the th01_orb_debug
branch for the code. To use it, simply replace REIIDEN.EXE, and
run the game in debug mode, via game d on the DOS prompt. If you
encounter a gameplay situation that doesn't seem to be covered by this blog
post, you can now verify it for yourself. Thanks to touhou-memories for bringing these
issues to my attention! That definitely was a glaring omission from the
initial version of this blog post.
With that clarified, we can now try mashing the Orb into these two vertical
bars:
At first, that workaround doesn't seem to make a difference here. As we
expect, the frame numbers now tell us that only one of the two bumper bars
in a row activates, but we couldn't have told otherwise as the number of
bars has no effect on newly applied Y velocity forces. On a closer look, the
Orb's rise to the top of the playfield is in fact caused by that
workaround though, combined with the unchanged top-to-bottom order of
collision testing. As soon as any bumper bar completed its 7
collision delay frames, it resets the aforementioned flag, which already
reactivates collision handling for any remaining vertical bumper bars during
the same frame. Look out for frames with both a 7 and a 1, like the one marked in the video above:
The 7 will always appear before
the 1 in the row-major order. Whenever
this happens, the current oscillation period is cut down from 7 to 6
frames – and because collision testing runs from top to bottom, this will
always happen during the falling part. Depending on the Y velocity, the
rising part may also be cut down to 6 frames from time to time, but that one
at least has a chance to last for the full 7 frames. This difference
adds those crucial extra frames of upward movement, which add up to send the
Orb to the top. Without the flag, you'd always see the Orb oscillating
between a fixed range of the bar column.
Finally, it's the "top of playfield" force that gradually slows down the Orb
and makes sure it ultimately only moves at sub-pixel velocities, which have
no visible effect. Because
📝 the regular effect of gravity is reset with
each newly applied force, it's completely negated during most of the climb.
This even holds true once the Orb reached the top: Since the Orb requires a
negative force to repeatedly arrive up there and be bounced back, this force
will stay active for the first 5 of the 7 collision frames and not move the
Orb at all. Once gravity kicks in at the 5th frame and adds 1 to
the Y velocity, it's already too late: The new velocity can't be larger than
0.5, and the Orb only has 1 or 2 frames before the flag reset causes it to
be bounced back up to the top again.
Portals, on the other hand, turn out to be much simpler than the old
description that ended up on Touhou Wiki in October 2005 might suggest.
Everything about their teleportations is random: The destination portal, the
exit force (as an integer between -9 and +9), as well as the exit X
velocity, with each of the
📝 5 distinct horizontal velocities having an
equal chance of being chosen. Of course, if the destination portal is next
to the left or right edge of the playfield and it chooses to fire the Orb
towards that edge, it immediately bounces off into the opposite direction,
whereas the 0 velocity is always selected with a constant 20% probability.
The selection process for the destination portal involves a bit more than a
single rand() call. The game bundles all obstacles in a single
structure of dynamically allocated arrays, and only knows how many obstacles
there are in total, not per type. Now, that alone wouldn't have much
of an impact on random portal selection, as you could simply roll a random
obstacle ID and try again if it's not a portal. But just to be extra cute,
ZUN instead iterates over all obstacles, selects any non-entered portal with
a chance of ¼, and just gives up if that dice roll wasn't successful after
16 loops over the whole array, defaulting to the entered portal in that
case.
In all its silliness though, this works perfectly fine, and results in a
chance of 0.7516(𝑛 - 1) for the Orb exiting out of the
same portal it entered, with 𝑛 being the total number of portals in a
stage. That's 1% for two portals, and 0.01% for three. Pretty decent for a
random result you don't want to happen, but that hurts nobody if it does.
The one tiny ZUN bug with portals is technically not even part of the newly
decompiled code here. If Reimu gets hit while the Orb is being sent through
a portal, the Orb is immediately kicked out of the portal it entered, no
matter whether it already shows up inside the sprite of the destination
portal. Neither of the two portal sprites is reset when this happens,
leading to "two Orbs" being visible simultaneously.
This makes very little sense no matter how you look at it. The Orb doesn't
receive a new velocity or force when this happens, so it will simply
re-enter the same portal once the gameplay resumes on Reimu's next life:
That left another ½ of a push over at the end. Way too much time to finish
FUUIN.exe, way too little time to start with Mima… but the bomb
animation fit perfectly in there. No secrets or bugs there, just a bunch of
sprite animation code wasting at least another 82 bytes in the data segment.
The special effect after the kuji-in sprites uses the same single-bitplane
32×32 square inversion effect seen at the end of Kikuri's and Sariel's
entrance animation, except that it's a 3-stack of 16-rings moving at 6, 7,
and 8 pixels per frame respectively. At these comparatively slow speeds, the
byte alignment of each square adds some further noise to the discoloration
pattern… if you even notice it below all the shaking and seizure-inducing
hardware palette manipulation.
And yes, due to the very destructive nature of the effect, the game does in
fact rely on it only being applied to VRAM page 0. While that will cause
every moving sprite to tear holes into the inverted squares along its
trajectory, keeping a clean playfield on VRAM page 1 is what allows all that
pixel damage to be easily undone at the end of this 89-frame animation.
Next up: Mima! Let's hope that stage obstacles already were the most complex
part remaining in TH01…
No technical obstacles for once! Just pure overcomplicated ZUN code. Unlike
📝 Konngara's main function, the main TH01
player function was every bit as difficult to decompile as you would expect
from its size.
With TH01 using both separate left- and right-facing sprites for all of
Reimu's moves and separate classes for Reimu's 32×32 and 48×*
sprites, we're already off to a bad start. Sure, sprite mirroring is
minimally more involved on PC-98, as the planar
nature of VRAM requires the bits within an 8-pixel byte to also be
mirrored, in addition to writing the sprite bytes from right to left. TH03
uses a 256-byte lookup table for this, generated at runtime by an infamous
micro-optimized and undecompilable ASM algorithm. With TH01's existing
architecture, ZUN would have then needed to write 3 additional blitting
functions. But instead, he chose to waste a total of 26,112 bytes of memory
on pre-mirrored sprites…
Alright, but surely selecting those sprites from code is no big deal? Just
store the direction Reimu is facing in, and then add some branches to the
rendering code. And there is in fact a variable for Reimu's direction…
during regular arrow-key movement, and another one while shooting and
sliding, and a third as part of the special attack types,
launched out of a slide.
Well, OK, technically, the last two are the same variable. But that's even
worse, because it means that ZUN stores two distinct enums at
the same place in memory: Shooting and sliding uses 1 for left,
2 for right, and 3 for the "invalid" direction of
holding both, while the special attack types indicate the direction in their
lowest bit, with 0 for right and 1 for left. I
decompiled the latter as bitflags, but in ZUN's code, each of the 8
permutations is handled as a distinct type, with copy-pasted and adapted
code… The interpretation of this
two-enum "sub-mode" union variable is controlled
by yet another "mode" variable… and unsurprisingly, two of the bugs in this
function relate to the sub-mode variable being interpreted incorrectly.
Also, "rendering code"? This one big function basically consists of separate
unblit→update→render code snippets for every state and direction Reimu can
be in (moving, shooting, swinging, sliding, special-attacking, and bombing),
pasted together into a tangled mess of nested if(…) statements.
While a lot of the code is copy-pasted, there are still a number of
inconsistencies that defeat the point of my usual refactoring treatment.
After all, with a total of 85 conditional branches, anything more than I did
would have just obscured the control flow too badly, making it even harder
to understand what's going on.
In the end, I spotted a total of 8 bugs in this function, all of which leave
Reimu invisible for one or more frames:
2 frames after all special attacks
2 frames after swing attacks, and
4 frames before swing attacks
Thanks to the last one, Reimu's first swing animation frame is never
actually rendered. So whenever someone complains about TH01 sprite
flickering on an emulator: That emulator is accurate, it's the game that's
poorly written.
And guess what, this function doesn't even contain everything you'd
associate with per-frame player behavior. While it does
handle Yin-Yang Orb repulsion as part of slides and special attacks, it does
not handle the actual player/Orb collision that results in lives being lost.
The funny thing about this: These two things are done in the same function…
Therefore, the life loss animation is also part of another function. This is
where we find the final glitch in this 3-push series: Before the 16-frame
shake, this function only unblits a 32×32 area around Reimu's center point,
even though it's possible to lose a life during the non-deflecting part of a
48×48-pixel animation. In that case, the extra pixels will just stay on
screen during the shake. They are unblitted afterwards though, which
suggests that ZUN was at least somewhat aware of the issue?
Finally, the chance to see the alternate life loss sprite is exactly ⅛.
As for any new insights into game mechanics… you know what? I'm just not
going to write anything, and leave you with this flowchart instead. Here's
the definitive guide on how to control Reimu in TH01 we've been waiting for
24 years:
Pellets are deflected during all gray
states. Not shown is the obvious "double-tap Z and X" transition from
all non-(#1) states to the Bomb state, but that would have made this
diagram even more unwieldy than it turned out. And yes, you can shoot
twice as fast while moving left or right.
While I'm at it, here are two more animations from MIKO.PTN
which aren't referenced by any code:
With that monster of a function taken care of, we've only got boss sprite animation as the final blocker of uninterrupted Sariel progress. Due to some unfavorable code layout in the Mima segment though, I'll need to spend a bit more time with some of the features used there. Next up: The missile bullets used in the Mima and YuugenMagan fights.
So, let's finally look at some TH01 gameplay structures! The obvious
choices here are player shots and pellets, which are conveniently located
in the last code segment. Covering these would therefore also help in
transferring some first bits of data in REIIDEN.EXE from ASM
land to C land. (Splitting the data segment would still be quite
annoying.) Player shots are immediately at the beginning…
…but wait, these are drawn as transparent sprites loaded from .PTN files.
Guess we first have to spend a push on
📝 Part 2 of this format.
Hm, 4 functions for alpha-masked blitting and unblitting of both 16×16 and
32×32 .PTN sprites that align the X coordinate to a multiple of 8
(remember, the PC-98 uses a
planar
VRAM memory layout, where 8 pixels correspond to a byte), but only one
function that supports unaligned blitting to any X coordinate, and only
for 16×16 sprites? Which is only called twice? And doesn't come with a
corresponding unblitting function?
Yeah, "unblitting". TH01 isn't
double-buffered,
and uses the PC-98's second VRAM page exclusively to store a stage's
background and static sprites. Since the PC-98 has no hardware sprites,
all you can do is write pixels into VRAM, and any animated sprite needs to
be manually removed from VRAM at the beginning of each frame. Not using
double-buffering theoretically allows TH01 to simply copy back all 128 KB
of VRAM once per frame to do this. But that
would be pretty wasteful, so TH01 just looks at all animated sprites, and
selectively copies only their occupied pixels from the second to the first
VRAM page.
Alright, player shot class methods… oh, wait, the collision functions
directly act on the Yin-Yang Orb, so we first have to spend a push on
that one. And that's where the impression we got from the .PTN
functions is confirmed: The orb is, in fact, only ever displayed at
byte-aligned X coordinates, divisible by 8. It's only thanks to the
constant spinning that its movement appears at least somewhat
smooth.
This is purely a rendering issue; internally, its position is
tracked at pixel precision. Sadly, smooth orb rendering at any unaligned X
coordinate wouldn't be that trivial of a mod, because well, the
necessary functions for unaligned blitting and unblitting of 32×32 sprites
don't exist in TH01's code. Then again, there's so much potential for
optimization in this code, so it might be very possible to squeeze those
additional two functions into the same C++ translation unit, even without
position independence…
More importantly though, this was the right time to decompile the core
functions controlling the orb physics – probably the highlight in these
three pushes for most people.
Well, "physics". The X velocity is restricted to the 5 discrete states of
-8, -4, 0, 4, and 8, and gravity is applied by simply adding 1 to the Y
velocity every 5 frames No wonder that this can
easily lead to situations in which the orb infinitely bounces from the
ground.
At least fangame authors now have
a
reference of how ZUN did it originally, because really, this bad
approximation of physics had to have been written that way on purpose. But
hey, it uses 64-bit floating-point variables!
…sometimes at least, and quite randomly. This was also where I had to
learn about Turbo C++'s floating-point code generation, and how rigorously
it defines the order of instructions when mixing double and
float variables in arithmetic or conditional expressions.
This meant that I could only get ZUN's original instruction order by using
literal constants instead of variables, which is impossible right now
without somehow splitting the data segment. In the end, I had to resort to
spelling out ⅔ of one function, and one conditional branch of another, in
inline ASM. 😕 If ZUN had just written 16.0 instead of
16.0f there, I would have saved quite some hours of my life
trying to decompile this correctly…
To sort of make up for the slowdown in progress, here's the TH01 orb
physics debug mod I made to properly understand them. Edit
(2022-07-12): This mod is outdated,
📝 the current version is here!2020-06-13-TH01OrbPhysicsDebug.zip
To use it, simply replace REIIDEN.EXE, and run the game
in debug mode, via game d on the DOS prompt.
Its code might also serve as an example of how to achieve this sort of
thing without position independence.
Alright, now it's time for player shots though. Yeah, sure, they
don't move horizontally, so it's not too bad that those are also
always rendered at byte-aligned positions. But, uh… why does this code
only use the 16×16 alpha-masked unblitting function for decaying shots,
and just sloppily unblits an entire 16×16 square everywhere else?
The worst part though: Unblitting, moving, and rendering player shots
is done in a single function, in that order. And that's exactly where
TH01's sprite flickering comes from. Since different types of sprites are
free to overlap each other, you'd have to first unblit all types, then
move all types, and then render all types, as done in later
PC-98 Touhou games. If you do these three steps per-type instead, you
will unblit sprites of other types that have been rendered before… and
therefore end up with flicker.
Oh, and finally, ZUN also added an additional sloppy 16×16 square unblit
call if a shot collides with a pellet or a boss, for some
guaranteed flicker. Sigh.
And that's ⅓ of all ZUN code in TH01 decompiled! Next up: Pellets!
Big gains, as expected, but not much to say about this one. With TH05 Reimu
being way too easy to decompile after
📝 the shot control groundwork done in October,
there was enough time to give the comprehensive PI false-positive
treatment to two other sets of functions present in TH04's and TH05's
OP.EXE. One of them, master.lib's super_*()
functions, was used a lot in TH02, more than in any other game… I
wonder how much more that game will progress without even focusing on it
in particular.
Alright then! 100% PI for TH04's and TH05's OP.EXE upcoming…
(Edit: Already got funding to cover this!)
… nope, with a game whose MAIN.EXE is still just 5%
reverse-engineered and which naturally makes heavy use of
structures, there's still a lot more PI groundwork to be done before RE
progress can speed up to the levels that we've now reached with TH05. The
good news is that this game is (now) way easier to understand: In contrast
to TH04 and TH05, where we needed to work towards player shots over a
two-digit number of pushes, TH03 only needed two for SPRITE16, and a half
one for the playfield shaking mechanism. After that, I could even already
decompile the per-frame shot update and render functions, thanks to TH03's
high number of code segments. Now, even the big 128-byte player structure
doesn't seem all too far off.
Then again, as TH03 shares no code with any other game, this actually was
a completely average PI push. For the remaining three, we'll return to
TH04 and TH05 though, which should more than make up for the slight drop
in RE speed after this one.
In other news, we've now also reached peak C++, with the introduction of
templates! TH03 stores movement speeds in a 4.4 fixed-point
format, which is an 8-bit spin on the usual 16-bit, 12.4 fixed-point
format.
And just in time for zorg's last outstanding pushes, the
TH05 shot type control functions made the speedup happen!
TH05 as a whole is now 20% reverse-engineered, and 50% position
independent,
TH05's MAIN.EXE is now even below TH02's in terms of not
yet RE'd instructions,
and all price estimates have now fallen significantly.
It would have been really nice to also include Reimu's shot
control functions in this last push, but figuring out this entire system,
with its weird bitflags and switch statement
micro-optimizations, was once again taking way longer than it should
have. Especially with my new-found insistence on turning this obvious
copy-pasta into something somewhat readable and terse…
But with such a rather tabular visual structure, things should now be
moddable in hopefully easily consistent way. Of course, since we're
only at 54% position independence for MAIN.EXE,
this isn't possible yet without
crashing the game, but modifying damage would already work.
So, let's continue with player shots! …eh, or maybe not directly, since they involve two other structure types in TH05, which we'd have to cover first. One of them is a different sort of sprite, and since I like me some context in my reverse-engineering, let's disable every other sprite type first to figure out what it is.
One of those other sprite types were the little sparks flying away from killed stage enemies, midbosses, and grazed bullets; easy enough to also RE right now. Turns out they use the same 8 hardcoded 8×8 sprites in TH02, TH04, and TH05. Except that it's actually 64 16×8 sprites, because ZUN wanted to pre-shift them for all 8 possible start pixels within a planar VRAM byte (rather than, like, just writing a few instructions to shift them programmatically), leading to them taking up 1,024 bytes rather than just 64.
Oh, and the thing I wanted to RE *actually* was the decay animation whenever a shot hits something. Not too complex either, especially since it's exclusive to TH05.
And since there was some time left and I actually have to pick some of the next RE places strategically to best prepare for the upcoming 17 decompilation pushes, here's two more function pointers for good measure.
Stumbled across one more drawing function in the way… which was only a duplicated and seemingly pointlessly micro-optimized copy of master.lib's super_roll_put_tiny() function, used for fast display of 4-color 16×16 sprites.
With this out of the way, we can tackle player shot sprite animation next. This will get rid of a lot of code, since every power level of every character's shot type is implemented in its own function. Which makes up thousands of instructions in both TH04 and TH05 that we can nicely decompile in the future without going through a dedicated reverse-engineering step.


 By the time the function is
called, the tile renderer has already blitted a few lines of the fully-lit
carpet tiles from the defined .MAP tile section, matching the scroll speed.
Fortunately, these are hidden behind the black TRAM cells above and below
the playfield…
By the time the function is
called, the tile renderer has already blitted a few lines of the fully-lit
carpet tiles from the defined .MAP tile section, matching the scroll speed.
Fortunately, these are hidden behind the black TRAM cells above and below
the playfield…
 And sure, the code does attempt to invalidate these newly blitted lines
every frame – but only relative to the current VRAM Y coordinate that
represents the top of the hardware-scrolled screen. Once we're back on the
original VRAM page on the next frame, the lines we initially set out to
remove could have already scrolled past that point, making it impossible to
ever catch up with them in this way.
And sure, the code does attempt to invalidate these newly blitted lines
every frame – but only relative to the current VRAM Y coordinate that
represents the top of the hardware-scrolled screen. Once we're back on the
original VRAM page on the next frame, the lines we initially set out to
remove could have already scrolled past that point, making it impossible to
ever catch up with them in this way.
 is exactly ⅛.

