Oh look, it's another rather short and straightforward boss with a rather
small number of bugs and quirks. Yup, contrary to the character's
popularity, Mima's premiere is really not all that special in terms of code,
and continues the trend established with
📝 Kikuri and
📝 SinGyoku. I've already covered
📝 the initial sprite-related bugs last November,
so this post focuses on the main code of the fight itself. The overview:
The TH01 Mima fight consists of 3 phases, with phases 1 and 3 each
corresponding to one half of the 12-HP bar.
📝 Just like with SinGyoku, the distinction
between the red-white and red parts is purely visual once again, and doesn't
reflect anything about the boss script. As usual, all of the phases have to
be completed in order.
Phases 1 and 3 cycle through 4 danmaku patterns each, for a total of 8.
The cycles always start on a fixed pattern.
3 of the patterns in each phase feature rotating white squares, thus
introducing a new sprite in need of being unblitted.
Phase 1 additionally features the "hop pattern" as the last one in its
cycle. This is the only pattern where Mima leaves the seal in the center of
the playfield to hop from one edge of the playfield towards the other, while
also moving slightly higher up on the Y axis, and staying on the final
position for the next pattern cycle. For the first time, Mima selects a
random starting edge, which is then alternated on successive cycles.
Since the square entities are local to the respective pattern function,
Phase 1 can only end once the current pattern is done, even if Mima's HP are
already below 6. This makes Mima susceptible to the
📝 test/debug mode HP bar heap corruption bug.
Phase 2 simply consists of a spread-in teleport back to Mima's initial
position in the center of the playfield. This would only have been strictly
necessary if phase 1 ended on the hop pattern, but is done regardless of the
previous pattern, and does provide a nice visual separation between the two
main phases.
That's it – nothing special in Phase 3.
And there aren't even any weird hitboxes this time. What is maybe
special about Mima, however, is how there's something to cover about all of
her patterns. Since this is TH01, it's won't surprise anyone that the
rotating square patterns are one giant copy-pasta of unblitting, updating,
and rendering code. At least ZUN placed the core polar→Cartesian
transformation in a separate function for creating regular polygons
with an arbitrary number of sides, which might hint toward some more varied
shapes having been planned at one point?
5 of the 6 patterns even follow the exact same steps during square update
frames:
Calculate square corner coordinates
Unblit the square
Update the square angle and radius
Use the square corner coordinates for spawning pellets or missiles
Recalculate square corner coordinates
Render the square
Notice something? Bullets are spawned before the corner coordinates
are updated. That's why their initial positions seem to be a bit off – they
are spawned exactly in the corners of the square, it's just that it's
the square from 8 frames ago.
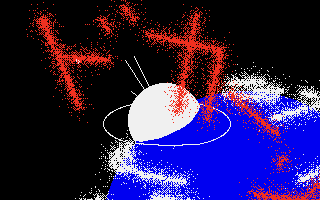
Mima's first pattern on Normal difficulty.
Once ZUN reached the final laser pattern though, he must have noticed that
there's something wrong there… or maybe he just wanted to fire those
lasers independently from the square unblit/update/render timer for a
change. Spending an additional 16 bytes of the data segment for conveniently
remembering the square corner coordinates across frames was definitely a
decent investment.
When Mima isn't shooting bullets from the corners of a square or hopping
across the playfield, she's raising flame pillars from the bottom of the playfield within very specifically calculated
random ranges… which are then rendered at byte-aligned VRAM positions, while
collision detection still uses their actual pixel position. Since I don't
want to sound like a broken record all too much, I'll just direct you to
📝 Kikuri, where we've seen the exact same issue with the teardrop ripple sprites.
The conclusions are identical as well.
Mima's flame pillar pattern. This video was recorded on a particularly
unlucky seed that resulted in great disparities between a pillar's
internal X coordinate and its byte-aligned on-screen appearance, leading
to lots of right-shifted hitboxes.
Also note how the change from the meteor animation to the three-arm 🚫
casting sprite doesn't unblit the meteor, and leaves that job to
any sprite that happens to fly over those pixels.
However, I'd say that the saddest part about this pattern is how choppy it
is, with the circle/pillar entities updating and rendering at a meager 7
FPS. Why go that low on purpose when you can just make the game render ✨
smoothly ✨ instead?
So smooth it's almost uncanny.
The reason quickly becomes obvious: With TH01's lack of optimization, going
for the full 56.4 FPS would have significantly slowed down the game on its
intended 33 MHz CPUs, requiring more than cheap surface-level ASM
optimization for a stable frame rate. That might very well have been ZUN's
reason for only ever rendering one circle per frame to VRAM, and designing
the pattern with these time offsets in mind. It's always been typical for
PC-98 developers to target the lowest-spec models that could possibly still
run a game, and implementing dynamic frame rates into such an engine-less
game is nothing I would wish on anybody. And it's not like TH01 is
particularly unique in its choppiness anyway; low frame rates are actually a
rather typical part of the PC-98 game aesthetic.
The final piece of weirdness in this fight can be found in phase 1's hop
pattern, and specifically its palette manipulation. Just from looking at the
pattern code itself, each of the 4 hops is supposed to darken the hardware
palette by subtracting #444 from every color. At the last hop,
every color should have therefore been reduced to a pitch-black
#000, leaving the player completely blind to the movement of
the chasing pellets for 30 frames and making the pattern quite ghostly
indeed. However, that's not what we see in the actual game:
Nothing in the pattern's code would cause the hardware palette to get
brighter before the end of the pattern, and yet…
The expected version doesn't look all too unfair, even on Lunatic…
well, at least at the default rank pellet speed shown in this
video. At maximum pellet speed, it is in fact rather brutal.
Looking at the frame counter, it appears that something outside the
pattern resets the palette every 40 frames. The only known constant with a
value of 40 would be the invincibility frames after hitting a boss with the
Orb, but we're not hitting Mima here…
But as it turns out, that's exactly where the palette reset comes from: The
hop animation darkens the hardware palette directly, while the
📝 infamous 12-parameter boss collision handler function
unconditionally resets the hardware palette to the "default boss palette"
every 40 frames, regardless of whether the boss was hit or not. I'd classify
this as a bug: That function has no business doing periodic hardware palette
resets outside the invincibility flash effect, and it completely defies
common sense that it does.
That explains one unexpected palette change, but could this function
possibly also explain the other infamous one, namely, the temporary green
discoloration in the Konngara fight? That glitch comes down to how the game
actually uses two global "default" palettes: a default boss
palette for undoing the invincibility flash effect, and a default
stage palette for returning the colors back to normal at the end of
the bomb animation or when leaving the Pause menu. And sure enough, the
stage palette is the one with the green color, while the boss
palette contains the intended colors used throughout the fight. Sending the
latter palette to the graphics chip every 40 frames is what corrects
the discoloration, which would otherwise be permanent.
The green color comes from BOSS7_D1.GRP, the scrolling
background of the entrance animation. That's what turns this into a clear
bug: The stage palette is only set a single time in the entire fight,
at the beginning of the entrance animation, to the palette of this image.
Apart from consistency reasons, it doesn't even make sense to set the stage
palette there, as you can't enter the Pause menu or bomb during a blocking
animation function.
And just 3 lines of code later, ZUN loads BOSS8_A1.GRP, the
main background image of the fight. Moving the stage palette assignment
there would have easily prevented the discoloration.
But yeah, as you can tell, palette manipulation is complete jank in this
game. Why differentiate between a stage and a boss palette to begin with?
The blocking Pause menu function could have easily copied the original
palette to a local variable before darkening it, and then restored it after
closing the menu. It's not so easy for bombs as the intended palette could
change between the start and end of the animation, but the code could have
still been simplified a lot if there was just one global "default palette"
variable instead of two. Heck, even the other bosses who manipulate their
palettes correctly only do so because they manually synchronize the two
after every change. The proper defense against bugs that result from wild
mutation of global state is to get rid of global state, and not to put up
safety nets hidden in the middle of existing effect code.
The easiest way of reproducing the green discoloration bug in
the TH01 Konngara fight, timed to show the maximum amount of time the
discoloration can possibly last.
In any case, that's Mima done! 7th PC-98 Touhou boss fully
decompiled, 24 bosses remaining, and 59 functions left in all of TH01.
In other thrilling news, my call for secondary funding priorities in new
TH01 contributions has given us three different priorities so far. This
raises an interesting question though: Which of these contributions should I
now put towards TH01 immediately, and which ones should I leave in the
backlog for the time being? Since I've never liked deciding on priorities,
let's turn this into a popularity contest instead: The contributions with
the least popular secondary priorities will go towards TH01 first, giving
the most popular priorities a higher chance to still be left over after TH01
is done. As of this delivery, we'd have the following popularity order:
TH05 (1.67 pushes), from T0182
Seihou (1 push), from T0184
TH03 (0.67 pushes), from T0146
Which means that T0146 will be consumed for TH01 next, followed by T0184 and
then T0182. I only assign transactions immediately before a delivery though,
so you all still have the chance to change up these priorities before the
next one.
Next up: The final boss of TH01 decompilation, YuugenMagan… if the current
or newly incoming TH01 funds happen to be enough to cover the entire fight.
If they don't turn out to be, I will have to pass the time with some Seihou
work instead, missing the TH01 anniversary deadline as a result.Edit (2022-07-18): Thanks to Yanga for
securing the funding for YuugenMagan after all! That fight will feature
slightly more than half of all remaining code in TH01's
REIIDEN.EXE and the single biggest function in all of PC-98
Touhou, let's go!
What's this? A simple, straightforward, easy-to-decompile TH01 boss with
just a few minor quirks and only two rendering-related ZUN bugs? Yup, 2½
pushes, and Kikuri was done. Let's get right into the overview:
Just like 📝 Elis, Kikuri's fight consists
of 5 phases, excluding the entrance animation. For some reason though, they
are numbered from 2 to 6 this time, skipping phase 1? For consistency, I'll
use the original phase numbers from the source code in this blog post.
The main phases (2, 5, and 6) also share Elis' HP boundaries of 10, 6,
and 0, respectively, and are once again indicated by different colors in the
HP bar. They immediately end upon reaching the given number of HP, making
Kikuri immune to the
📝 heap corruption in test or debug mode that can happen with Elis and Konngara.
Phase 2 solely consists of the infamous big symmetric spiral
pattern.
Phase 3 fades Kikuri's ball of light from its default bluish color to bronze over 100 frames. Collision detection is deactivated
during this phase.
In Phase 4, Kikuri activates her two souls while shooting the spinning
8-pellet circles from the previously activated ball. The phase ends shortly
after the souls fired their third spread pellet group.
Note that this is a timed phase without an HP boundary, which makes
it possible to reduce Kikuri's HP below the boundaries of the next
phases, effectively skipping them. Take this video for example,
where Kikuri has 6 HP by the end of Phase 4, and therefore directly
starts Phase 6.
(Obviously, Kikuri's HP can also be reduced to 0 or below, which will
end the fight immediately after this phase.)
Phase 5 combines the teardrop/ripple "pattern" from the souls with the
"two crossed eye laser" pattern, on independent cycles.
Finally, Kikuri cycles through her remaining 4 patterns in Phase 6,
while the souls contribute single aimed pellets every 200 frames.
Interestingly, all HP-bounded phases come with an additional hidden
timeout condition:
Phase 2 automatically ends after 6 cycles of the spiral pattern, or
5,400 frames in total.
Phase 5 ends after 1,600 frames, or the first frame of the
7th cycle of the two crossed red lasers.
If you manage to keep Kikuri alive for 29 of her Phase 6 patterns,
her HP are automatically set to 1. The HP bar isn't redrawn when this
happens, so there is no visual indication of this timeout condition even
existing – apart from the next Orb hit ending the fight regardless of
the displayed HP. Due to the deterministic order of patterns, this
always happens on the 8th cycle of the "symmetric gravity
pellet lines from both souls" pattern, or 11,800 frames. If dodging and
avoiding orb hits for 3½ minutes sounds tiring, you can always watch the
byte at DS:0x1376 in your emulator's memory viewer. Once
it's at 0x1E, you've reached this timeout.
So yeah, there's your new timeout challenge.
The few issues in this fight all relate to hitboxes, starting with the main
one of Kikuri against the Orb. The coordinates in the code clearly describe
a hitbox in the upper center of the disc, but then ZUN wrote a < sign
instead of a > sign, resulting in an in-game hitbox that's not
quite where it was intended to be…
Kikuri's actual hitbox.
Since the Orb sprite doesn't change its shape, we can visualize the
hitbox in a pixel-perfect way here. The Orb must be completely within
the red area for a hit to be registered.
Much worse, however, are the teardrop ripples. It already starts with their
rendering routine, which places the sprites from TAMAYEN.PTN at byte-aligned VRAM positions in the ultimate piece of if(…) {…}
else if(…) {…} else if(…) {…} meme code. Rather than
tracking the position of each of the five ripple sprites, ZUN suddenly went
purely functional and manually hardcoded the exact rendering and collision
detection calls for each frame of the animation, based on nothing but its
total frame counter.
Each of the (up to) 5 columns is also unblitted and blitted individually
before moving to the next column, starting at the center and then
symmetrically moving out to the left and right edges. This wouldn't be a
problem if ZUN's EGC-powered unblitting function didn't word-align its X
coordinates to a 16×1 grid. If the ripple sprites happen to start at an
odd VRAM byte position, their unblitting coordinates get rounded both down
and up to the nearest 16 pixels, thus touching the adjacent 8 pixels of the
previously blitted columns and leaving the well-known black vertical bars in
their place.
OK, so where's the hitbox issue here? If you just look at the raw
calculation, it's a slightly confusingly expressed, but perfectly logical 17
pixels. But this is where byte-aligned blitting has a direct effect on
gameplay: These ripples can be spawned at any arbitrary, non-byte-aligned
VRAM position, and collisions are calculated relative to this internal
position. Therefore, the actual hitbox is shifted up to 7 pixels to the
right, compared to where you would expect it from a ripple sprite's
on-screen position:
Due to the deterministic nature of this part of the fight, it's
always 5 pixels for this first set of ripples. These visualizations are
obviously not pixel-perfect due to the different potential shapes of
Reimu's sprite, so they instead relate to her 32×32 bounding box, which
needs to be entirely inside the red
area.
We've previously seen the same issue with the
📝 shot hitbox of Elis' bat form, where
pixel-perfect collision detection against a byte-aligned sprite was merely a
sidenote compared to the more serious X=Y coordinate bug. So why do I
elevate it to bug status here? Because it directly affects dodging: Reimu's
regular movement speed is 4 pixels per frame, and with the internal position
of an on-screen ripple sprite varying by up to 7 pixels, any micrododging
(or "grazing") attempt turns into a coin flip. It's sort of mitigated
by the fact that Reimu is also only ever rendered at byte-aligned
VRAM positions, but I wouldn't say that these two bugs cancel out each
other.
Oh well, another set of rendering issues to be fixed in the hypothetical
Anniversary Edition – obviously, the hitboxes should remain unchanged. Until
then, you can always memorize the exact internal positions. The sequence of
teardrop spawn points is completely deterministic and only controlled by the
fixed per-difficulty spawn interval.
Aside from more minor coordinate inaccuracies, there's not much of interest
in the rest of the pattern code. In another parallel to Elis though, the
first soul pattern in phase 4 is aimed on every difficulty except
Lunatic, where the pellets are once again statically fired downwards. This
time, however, the pattern's difficulty is much more appropriately
distributed across the four levels, with the simultaneous spinning circle
pellets adding a constant aimed component to every difficulty level.
Kikuri's phase 4 patterns, on every difficulty.
That brings us to 5 fully decompiled PC-98 Touhou bosses, with 26 remaining…
and another ½ of a push going to the cutscene code in
FUUIN.EXE.
You wouldn't expect something as mundane as the boss slideshow code to
contain anything interesting, but there is in fact a slight bit of
speculation fuel there. The text typing functions take explicit string
lengths, which precisely match the corresponding strings… for the most part.
For the "Gatekeeper 'SinGyoku'" string though, ZUN passed 23
characters, not 22. Could that have been the "h" from the Hepburn
romanization of 神玉?!
Also, come on, if this text is already blitted to VRAM for no reason,
you could have gone for perfect centering at unaligned byte positions; the
rendering function would have perfectly supported it. Instead, the X
coordinates are still rounded up to the nearest byte.
The hardcoded ending cutscene functions should be even less interesting –
don't they just show a bunch of images followed by frame delays? Until they
don't, and we reach the 地獄/Jigoku Bad Ending with
its special shake/"boom" effect, and this picture:
Picture #2 from ED2A.GRP.
Which is rendered by the following code:
for(int i = 0; i <= boom_duration; i++) { // (yes, off-by-one)
	if((i & 3) == 0) {
		graph_scrollup(8);
	} else {
		graph_scrollup(0);
	}

	end_pic_show(1); // ← different picture is rendered
	frame_delay(2);  // ← blocks until 2 VSync interrupts have occurred

	if(i & 1) {
		end_pic_show(2); // ← picture above is rendered
	} else {
		end_pic_show(1);
	}
}
Notice something? You should never see this picture because it's
immediately overwritten before the frame is supposed to end. And yet
it's clearly flickering up for about one frame with common emulation
settings as well as on my real PC-9821 Nw133, clocked at 133 MHz.
master.lib's graph_scrollup() doesn't block until VSync either,
and removing these calls doesn't change anything about the blitted images.
end_pic_show() uses the EGC to blit the given 320×200 quarter
of VRAM from page 1 to the visible page 0, so the bottleneck shouldn't be
there either…
…or should it? After setting it up via a few I/O port writes, the common
method of EGC-powered blitting works like this:
Read 16 bits from the source VRAM position on any single
bitplane. This fills the EGC's 4 16-bit tile registers with the VRAM
contents at that specific position on every bitplane. You do not care
about the value the CPU returns from the read – in optimized code, you would
make sure to just read into a register to avoid useless additional stores
into local variables.
Write any 16 bits
to the target VRAM position on any single bitplane. This copies the
contents of the EGC's tile registers to that specific position on
every bitplane.
To transfer pixels from one VRAM page to another, you insert an additional
write to I/O port 0xA6 before 1) and 2) to set your source and
destination page… and that's where we find the bottleneck. Taking a look at
the i486 CPU and its cycle
counts, a single one of these page switches costs 17 cycles – 1 for
MOVing the page number into AL, and 16 for the
OUT instruction itself. Therefore, the 8,000 page switches
required for EGC-copying a 320×200-pixel image require 136,000 cycles in
total.
And that's the optimal case of using only those two
instructions. 📝 As I implied last time, TH01
uses a function call for VRAM page switches, complete with creating
and destroying a useless stack frame and unnecessarily updating a global
variable in main memory. I tried optimizing ZUN's code by throwing out
unnecessary code and using 📝 pseudo-registers
to generate probably optimal assembly code, and that did speed up the
blitting to almost exactly 50% of the original version's run time. However,
it did little about the flickering itself. Here's a comparison of the first
loop with boom_duration = 16, recorded in DOSBox-X with
cputype=auto and cycles=max, and with
i overlaid using the text chip. Caution, flashing lights:
The original animation, completing in 50 frames instead of the expected
34, thanks to slow blitting. Combined with the lack of
double-buffering, this results in noticeable tearing as the screen
refreshes while blitting is still in progress.
(Note how the background of the ドカーン image is shifted 1 pixel to the left compared to pic
#1.)
This optimized version completes in the expected 34 frames. No tearing
happens to be visible in this recording, but the ドカーン image is still visible on every
second loop iteration. (Note how the background of the ドカーン image is shifted 1 pixel to the left compared to pic
#1.)
I pushed the optimized code to the th01_end_pic_optimize
branch, to also serve as an example of how to get close to optimal code out
of Turbo C++ 4.0J without writing a single ASM instruction.
And if you really want to use the EGC for this, that's the best you can do.
It really sucks that it merely expanded the GRCG's 4×8-bit tile register to
4×16 bits. With 32 bits, ≥386 CPUs could have taken advantage of their wider
registers and instructions to double the blitting performance. Instead, we
now know the reason why
📝 Promisence Soft's EGC-powered sprite driver that ZUN later stole for TH03
is called SPRITE16 and not SPRITE32. What a massive disappointment.
But what's perhaps a bigger surprise: Blitting planar
images from main memory is much faster than EGC-powered inter-page
VRAM copies, despite the required manual access to all 4 bitplanes. In
fact, the blitting functions for the .CDG/.CD2 format, used from TH03
onwards, would later demonstrate the optimal method of using REP
MOVSD for blitting every line in 32-pixel chunks. If that was also
used for these ending images, the core blitting operation would have taken
((12 + (3 × (320 / 32))) × 200 × 4) =
	33,600
cycles, with not much more overhead for the surrounding row
and bitplane loops. Sure, this doesn't factor in the whole infamous issue of
VRAM being slow on PC-98, but the aforementioned 136,000 cycles don't even
include any actual blitting either. And as you move up to later PC-98
models with Pentium CPUs, the gap between OUT and REP
MOVSD only becomes larger. (Note that the page I linked above has a
typo in the cycle count of REP MOVSD on Pentium CPUs: According
to the original Intel Architecture and Programming Manual, it's
13+𝑛, not 3+𝑛.)
This difference explains why later games rarely use EGC-"accelerated"
inter-page VRAM copies, and keep all of their larger images in main memory.
It especially explains why TH04 and TH05 can get away with naively redrawing
boss backdrop images on every frame.
In the end, the whole fact that ZUN did not define how long this image
should be visible is enough for me to increment the game's overall bug
counter. Who would have thought that looking at endings of all things
would teach us a PC-98 performance lesson… Sure, optimizing TH01 already
seemed promising just by looking at its bloated code, but I had no idea that
its performance issues extended so far past that level.
That only leaves the common beginning part of all endings and a short
main() function before we're done with FUUIN.EXE,
and 98 functions until all of TH01 is decompiled! Next up: SinGyoku, who not
only is the quickest boss to defeat in-game, but also comes with the least
amount of code. See you very soon!
 from the bottom of the playfield within very specifically calculated
random ranges… which are then rendered at byte-aligned VRAM positions, while
collision detection still uses their actual pixel position. Since I don't
want to sound like a broken record all too much, I'll just direct you to
📝 Kikuri, where we've seen the exact same issue with the teardrop ripple sprites.
The conclusions are identical as well.
from the bottom of the playfield within very specifically calculated
random ranges… which are then rendered at byte-aligned VRAM positions, while
collision detection still uses their actual pixel position. Since I don't
want to sound like a broken record all too much, I'll just direct you to
📝 Kikuri, where we've seen the exact same issue with the teardrop ripple sprites.
The conclusions are identical as well.


 at byte-aligned VRAM positions in the ultimate piece of